HOME PAGE | < Previous | Contents | Next >
Adjustment after ADF Replacement
1.8 ADJUSTMENT AFTER ADF REPLACEMENT
If the ADF is being replaced, do SP4-730-001, SP4-730-004 and SP4-730-002 (in that order) after the new ADF has been installed.
1.8.1 CHECKING THE VERTICAL REGISTRATION
SP6-006-001 (ADF Adjustment Side-to-Side Regist: Front) SP6-006-002 (ADF Adjustment Side-to-Side Regist: Rear)
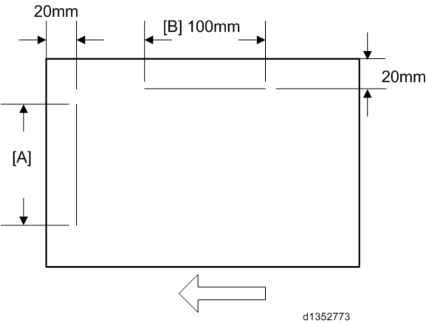
1. Create an original as shown in the following picture.

The large white arrow indicates the direction of feed.
2. Copy the original and make sure that the position of the line [A] is within 0±1mm
3. If not within the standard, adjust with the SP modes.
1.8.2 CHECKING THE HORIZONTAL REGISTRATION
SP6-006-010 (ADF Adjustment L-Edge Regist (1-Pass): Front) SP6-006-011 (ADF Adjustment L-Edge Regist (1-Pass): Rear)
1. Copy the original and make sure that the position of the line [B] is within 0±2mm.
2. If not within the standard, adjust with the SP modes.