HOME PAGE | < Previous | Contents | Next >
Printer and P/S Options (Basic Models)

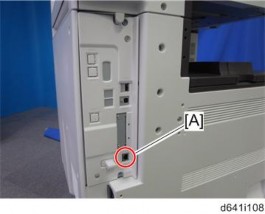
12. Connect the Ethernet interface cable to the 10BASE-T/100BASE-TX port [A].
13. Connect the other end of the Ethernet interface cable to a network connection device such as a hub.
14. Connect the machine’s power cord and turn the main power switch on.
15. Enable the NIB and/or USB function.
To enable the NIB function, enter the SP mode and set SP5985-001 (On Board NIC) to "1" (Enable).
To enable the USB function, enter the SP mode and set SP5985-002 (On Board USB) to “1" (Enable).
1.2.4 SCANNER ENHANCE OPTION
Accessory Check
Refer to the "Common Accessory Table" in this chapter.
Installation (Application Merge)
The installation of the scanner enhance option are done with SP5873-001 (Application Move).
![]()
If you are going to update the RPCS unit with both the printer and scanner enhance options, the order of execution is not important.
1. Turn off the copier.
2. Remove the cover ![]() x1).
x1).
3. Confirm that the Printer Unit SD card is in SD card Slot 1 (Upper Slot).
4. Put the option SD Card (Scanner Enhance Option) in SD card Slot 2 (Lower Slot).
5. Open the front door.
6. Turn the copier on.
7. Go into the SP mode and select SP5873-001.
8. Touch "Execute".
9. Read the instructions on the display and touch "Execute" to start.
10. When the display tells you copying is completed, touch "Exit", then turn the copier off.
Printer Scanner Unit Type 5002 (D641)
Printer Scanner Unit Type 5002 (D641)
Printer Scanner Unit Type 5002 (D641)
Printer and P/S Options (Basic Models)
11. Remove the option SD card from Slot 2 (Lower Slot).
12. Turn the copier on.
13. Go into the User Tools mode and confirm that update was successful.
14. User Tools> System Settings> Administrator Tools> Firmware Version> Next
15. Turn the copier off again, then reattach the cover.
16. Return the copied SD card to the customer for safekeeping, or tape it to the faceplate of the controller.
To undo an option update
1. Turn the main switch off.
2. Confirm that the Printer Unit SD card is in SD card Slot 1 (Upper Slot).
3. Put the original option SD card (Scanner Enhance Option) in SD card Slot 2 (Lower Slot).
4. Turn the main switch on.
5. Go into the SP mode and do SP5873-002 (Undo Exec).
6. Follow the messages on the operation panel to complete the procedure.
7. Turn the main switch off.
8. Remove the option SD card from Slot 2 (Lower Slot).
9. Turn the main switch on.
10. Go into the User Tools mode and confirm that undo was successful.
User Tools> System Settings> Administrator Tools> Firmware Version> Next
11. Turn the copier off again, then reattach the cover.
Important Notes about SD Cards
Here are some basic rules about merging applications on SD cards.
The data necessary for authentication is transferred with the application program to the target SD card.
The SD card is the only evidence that the customer is licensed to use the application program. The service technician may occasionally need to check the SD card and its data to solve problems. SD cards must be stored in a safe location at the work site.
Once the merge is completed, the SD card from which the application was copied cannot be used again, but the customer must keep the card to serve as proof of purchase.
An SD card from which an application has been moved to another SD card can be restored to full operation with SP5873-002 (Undo).
Before storing the card from which an application has been copied, label it carefully so that you can identify it easily if you need to do the undo procedure later.