MOTORS
[A]
[C]
[A]
[A]
[D
[C]
]
After the copies have been stapled, the stack feed-out motor [A] starts. The pawl
on the stack feed-out belt [C] transports the set of stapled copies up and feeds it to the shift roller. The shift roller takes over stack feed-out after the leading edge reaches this roller.
Just before the stapled stack passes through the lower tray exit sensor, the stack- feed-out motor turns off until the shift rollers have completely fed the stack out to the lower tray. Then, the stack-feed-out motor turns on again until the pawl actuates the stack feed-out belt home position sensor [D].

: See or Refer to
: Screws
: Connector
: Clip ring
: E-ring
: Clamp
ARDF DF3010/ DF3070 (B802/D630)
ADF pick-up motor bracket [D] ( x 3,
5. x 1)
6. ADF pick-up motor [E] ( x 2, x 1, timing belt)
ARDF DF3010/ DF3070 (B802/D630)
UPPER TRANSPORT MOTOR AND EXIT MOTOR
[A]
[C]
- Rear cover (1.1)
- Motor assembly [A] ( x 4, x 2)
- Upper transport motor ( x 4)
[*]Exit motor [C] ( x 4)
[*]LOWER TRANSPORT MOTOR
[A]
- Main PCB (1.1)
- Lower transport motor [A] ( x 2, x 1)
[*]MOTORS AND SENSORS
[A]
[C]
PREPARATION
- Front cover and inner cover (1.2)
- Upper side cover [A] ( x 2)
1000-Sheet Finisher SR790/SR3090
B408/D588
- Upper tray ( x 1)
[D]
[*]Lower side cover [C] ( x 2)
[*]Loosen the 2 screws [D].
[*]Lower the lower tray guide plate [E].
[*]Guide plate [F] ( x 4)
[E]
[F]
MOTORS AND SENSORS
[*]STACK HEIGHT SENSOR
x
[A]
- Stack height sensor assembly [A] ( 1)
- Stack height sensor ( x 1)
[*]STAPLER TRAY PAPER SENSOR
1. Stapler tray paper sensor [A] ( x 1)
[A]
[*]LOWER TRAY LIFT MOTOR
1. Lower tray lift motor [A] ( x 2, x 1)
[A]
1000-Sheet Finisher SR790/SR3090
B408/D588
[*]STACK FEED-OUT MOTOR
[A]
- Stack feed-out motor [A] ( x 2, x 1)
JAM DETECTION
TROUBLESHOOTING
JAM DETECTION
DIP SWITCH SETTINGSMode Jam Content Shift Staple
Entrance sensor: On check The entrance sensor does not turn on within the normal time after the main machine exit sensor turns on Entrance sensor: Off check The entrance sensor does not turn off within the normal time after it turns on.
Lower tray exit sensor: On check The lower tray exit sensor does not turn on within the normal time after the entrance sensor turns off. Tray exit sensor: Off check The tray exit sensor does not turn off within the normal time after it turns on.
Stapler tray entrance sensor: On check The stapler tray entrance sensor does not switch on within the normal time after the entrance sensor switched on.
Stapler tray entrance sensor: Off check The staple tray entrance sensor does not turn off within the normal time after it turns on.
Lower tray exit sensor: On check The lower exit sensor does not turn on after the feed-out pawl feeds out the outputs.
Lower tray exit sensor: Off check The lower exit sensor turns on when the feed-out pawl returns to its home position after feeding out the outputs.
SERVICE TABLES
DIP SWITCH SETTINGS
The DIP switches should not be set to any combination other than those listed in the table below.
Description 0 0 Normal operation mode (Default) 1 0 Packing mode.
SW100
1 2
- Before packing the machine, do the following: Set switch 1 to 1 then back to zero. The lower tray moves to the lowest position. Then turn off the main switch.
1000-Sheet Finisher SR790/SR3090
B408/D588
- After unpacking the machine, do the following: After turning the main switch back on, the lower tray returns to home position automatically.
GENERAL LAYOUT
- Before packing the machine, do the following: Set switch 1 to 1 then back to zero. The lower tray moves to the lowest position. Then turn off the main switch.
DETAILED DESCRIPTIONS
GENERAL LAYOUT
2 3
1
13 4
5
6
12 7
11
10
8
9
- Upper Tray
- Upper Tray Exit Roller
- Entrance Roller
- Tray Junction Gate
- Upper Transport Roller
- Stapler Junction Gate
- Lower Transport Rollers
- Stapler
- Stack Feed-out Belt
- Positioning Roller
- Shift Roller
- Lower Tray
- Lower Tray Exit Roller
ELECTRICAL COMPONENT LAYOUT
ELECTRICAL COMPONENT LAYOUT
1 2 3
11
4
5
10
9 8 7 6 12
1000-Sheet Finisher SR790/SR3090
B408/D588
19 13
18 14
20
21 17
16 15
- Upper Cover Switch
- Paper Limit Sensor
- Entrance Sensor
- Exit Guide Plate Motor
- Exit Guide Plate HP Sensor
- Front Door Safety Switch
- Stack Height Sensor
- Lower Tray Exit Sensor
- Lower Tray Upper Limit Switch
- Shift HP Sensor
- Shift Motor
- Jogger Fence HP Sensor
- Positioning Roller Solenoid
- Stapler HP Sensor
- Stapler Tray Entrance Sensor
- Stapler Tray Paper Sensor
- Stapler Hammer Motor
- Staple Sheet Sensor
- Stack Feed-out Belt HP Sensor
- Stapler Rotation HP Sensor
- Staple Sensor
22
24
32
31
30
29
28
27 23
26
25
- Tray Junction Gate Solenoid
- Lower Tray Lift Motor
- Lower Tray Lower Limit Sensor
- Stapler Motor
- Jogger Fence Motor
- Stack Feed-out Motor
- Main Board
- Lower Transport Motor
- Stapler Junction Gate Solenoid
- Exit Motor
- Upper Transport Motor
ELECTRICAL COMPONENT DESCRIPTION
1000-Sheet Finisher SR790/SR3090
B408/D588
ELECTRICAL COMPONENT DESCRIPTION
Symbol Name Function Index No. Motors M1 Upper Transport Drives the entrance roller and upper transport rollers. 32 M2 Lower Transport Drives the lower transport rollers and the positioning roller. 29 M3 Jogger Fence Drives the jogger fences. 26 M4 Staple Hammer Drives the staple hammer. 17 M5 Stack Feed-out Drives the stack feed-out belt. 27 M6 Exit Guide Plate Opens and closes the exit guide plate. 4 M7 Exit Drives the exit roller. 31 M8 Lower Tray Lift Moves the lower tray up or down. 23 M9 Shift Moves the shift roller from side to side. 11 M10 Stapler Moves the stapler unit from side to side. 25 Sensors S1 Entrance Detects copy paper entering the finisher and checks for misfeeds. 3 S2 Paper Limit Detects when the paper stack height in the upper tray is at its limit. 2 S3 Jogger Fence HP Detects when the jogger fence is at home position. 12 S4 Shift HP Detects when the shift roller is at home position. 10 S5 Stack Feed-out Belt HP Detects when the stack feed-out belt is at home position. 19 S6 Stapler HP Detects when the stapler is at home position. 14 S7 Exit Guide Plate HP Detects when the exit guide plate is at home position. 5 S8 Stapler Tray Entrance Detects copy paper entering the stapler tray and checks for misfeeds. 15 S9 Lower Tray Exit Checks for misfeeds. 8 S10 Stack Height Detects the top of the copy paper stack. 7 S11 Lower Tray Lower Limit Detects when the lower tray is at its lower limit position. 24 S12 Stapler Tray Paper Detects when there is copy paper in the stapler tray. 16 S13 Staple Sheet Detects the leading edge of the staple sheet. 18 S14 Stapler Rotation HP Detects when the staple hammer is at home position. 20 S15 Staple Detects whether there are staples in the staple cartridge. 21 Solenoids SOL1 Tray Junction Gate Drives the tray junction gate. 22 SOL2 Stapler Junction Gate Drives the stapler junction gate. 30
DRIVE LAYOUTSymbol Name Function Index No. SOL3 Positioning Roller Moves the positioning roller. 13 Switches SW1 Lower Tray Upper Limit Detects when the lower tray is at its upper limit position. 9 SW2 Front Door Safety Cuts the dc power when the front door is opened. 6 SW3 Upper Cover Cuts the dc power when the upper cover is opened. 1 PCBs PCB1 Main Controls the finisher and communicates with the copier/printer. 28
DRIVE LAYOUT
1
2
5
4
3
6
7
9
1000-Sheet Finisher SR790/SR3090
B408/D588
8
- Exit Motor
- Upper Transport Motor
- Lower Transport Motor
- Shift Motor
- Exit Guide Plate Motor
- Lower Tray Lift Motor
- Stack Feed-out Motor
- Jogger Motor
- Stapler Motor
JUNCTION GATES
JUNCTION GATES
[A
[C]
[D
]
]
Depending on the finishing mode, the copies are directed up, straight through, or down by the combination of the tray junction gate [A] and stapler junction gate . These gates are controlled by the tray junction gate solenoid [C] and stapler junction gate solenoid [D].
Upper Tray Mode
The tray junction gate solenoid remains off. The copies go up to the upper tray.
Sort/Stack Mode
The tray junction gate solenoid turns on and the stapler junction gate solenoid remains off. The copies are sent to the lower tray directly.
Staple Mode
The tray junction gate solenoid and the stapler junction gate solenoid both turn on. The copies go down to the jogger unit.
[*]UPPER TRAY
UPPER TRAY
[A]
1000-Sheet Finisher SR790/SR3090
B408/D588
When the paper limit sensor [A] switches on during feed-out for each of three consecutive sheets of paper, paper overflow is detected.
LOWER TRAY UP/DOWN MECHANISMS
[*]LOWER TRAY UP/DOWN MECHANISMS
[G]
[C]
[F]
[A]
[D]
[E]
The vertical position of the lower tray [A] depends on the height of the copied paper stack on the lower tray. The stack height sensor feeler contacts the top of the stack, and the lower tray lift motor [C] controls the tray height.
When the lower tray reaches its lowest possible position, the actuator [D] turns on the lower tray lower limit sensor [E], and copying stops.
Tray Up
When the copy paper on the tray is removed, the stack height sensor [F] turns off and the tray lifts up. Then, the tray stops when the sensor turns on again (the tray pushes up the feeler).
If the stack height sensor fails, the lower tray upper limit switch [G] detects the tray and stops the motor. This is a safety measure against stack height sensor failure.
Sort/Stack Mode (Tray Down)
Every five sheets of paper, the tray goes down until the sensor turns off again. Then, it goes up until the sensor is on again.
Staple Mode (Tray Down)
After a stapled copy is fed out, the tray goes up for 220 ms and stops for 300 ms. Then, it goes down for 1 second, waits for 500 ms, then goes up until the sensor turns on.
[*]PAPER SHIFT MECHANISM
PAPER SHIFT MECHANISM
[F] [C]
[A]
[D]
[E]
1000-Sheet Finisher SR790/SR3090
B408/D588
In the sort/stack mode, the shift roller [A] moves from side to side to separate the sets of copies.
The horizontal position of the shift roller is controlled by the shift motor and the shift gear disk [C]. After the trailing edge of the copy passes the upper transport roller, the shift motor turns on, driving the shift gear disk and the link [D].
After the paper is delivered to the lower tray [E], the shift roller moves to its home position, which is detected by the shift HP sensor [F]. Then, when the trailing edge of the next copy passes the upper transport roller, the shift roller shifts again. This operation is done every sheet.
When the trailing edge of each page in the next set of copies passes the upper transport roller, the shift roller shifts in the opposite direction.
JOGGER UNIT PAPER POSITIONING MECHANISM
[*]JOGGER UNIT PAPER POSITIONING MECHANISM
[A
[C]
[D]
[F]
[E]
]
In staple mode, each sheet of copy paper is vertically and horizontally aligned when it arrives in the jogger unit.
For the vertical paper alignment, the positioning roller solenoid [A] turns on shortly after the stapler tray entrance sensor turns off, and the positioning roller [C] pushes the copy against the bottom of the stack stopper [D].
For the horizontal paper alignment, the jogger front fence [E] and the rear fence [F] move to the waiting position, which is 18 mm away from the side of the paper.
When aligning the paper vertically, the jogger fence moves in 14 mm from the waiting position. After the vertical position has been aligned, the jogger fence pushes the paper 4 mm against the rear fence to align the paper horizontally. Then the jogger fence moves back to the previous position.
[*]EXIT GUIDE PLATE
EXIT GUIDE PLATE
[C]
[A]
[D]
1000-Sheet Finisher SR790/SR3090
B408/D588
When stacking a large size of paper (such as A3, DLT) in the jogger unit, the leading edge of the paper reaches the exit rollers. To prevent the paper from running into the exit rollers and not being aligned correctly, the exit guide plate [A] is moved up to make a gap between the exit rollers. This operation is done for all paper sizes, but is only needed for the larger sizes.
The exit guide plate motor and exit roller release cam [C] control the exit guide plate movement. When the exit guide plate motor starts, the cam turns and the exit guide plate moves up. When stapling is finished, the exit guide plate motor turns on again to close the exit guide plate. When the exit guide plate HP sensor [D] turns on, the motor stops.
STAPLER MECHANISM
[*]STAPLER MECHANISM
[E]
[D]
[C]
[A]
The staple hammer motor [A] drives the staple hammer.
The staple sheet sensor detects the leading edge of the staple sheet at the stapling position to prevent the hammer from operating if there are no staples at the stapling position.
If there is no staple cartridge in the stapler unit or no staples in the staple cartridge, staple end is indicated on the operation panel. The stapler sensor [C] detects this.
The stapler rotation HP sensor [D] checks whether the staple hammer mechanism returns to home position after each stack has been stapled.
When excessive load is applied to the staple hammer motor, the copier detects a staple jam. When a staple jam has occurred, the jammed staple is inside the staple cartridge [E]. Therefore, the jammed staple can be removed easily after pulling out the staple cartridge.
STAPLER UNIT MOVEMENT MECHANISM
[*]STAPLER UNIT MOVEMENT MECHANISM
[A]
1000-Sheet Finisher SR790/SR3090
B408/D588
The stapler motor moves the stapler [A] from side to side. After the start key is pressed, the stapler moves from its home position to the stapling position.
If two-staple-position mode is selected, the stapler moves to the front stapling position first, then moves to the rear stapling position. However, for the next copy set, it staples in the reverse order (at the rear side first, then at the front side).
After the job is completed, the stapler moves back to its home position. The stapler HP sensor detects this.
PAPER FEED-OUT MECHANISM
[*]PAPER FEED-OUT MECHANISM
[A]
[D
[C]
]
After the copies have been stapled, the stack feed-out motor [A] starts. The pawl
on the stack feed-out belt [C] transports the set of stapled copies up and feeds it to the shift roller. The shift roller takes over stack feed-out after the leading edge reaches this roller.
Just before the stapled stack passes through the lower tray exit sensor, the stack- feed-out motor turns off until the shift rollers have completely fed the stack out to the lower tray. Then, the stack-feed-out motor turns on again until the pawl actuates the stack feed-out belt home position sensor [D].
| R EVI SIO N HIS TORY | ||
| Page | Date | Added/ Updated/ New |
| None |
B802/D630 ARDF DF3010/DF3070
ARDF DF3010/DF3070 (B802/D630)
TABLE OF CONTENTS
REPLACEMENT AND ADJUSTMENT 1
- COVERS AND TRAY 1
- FRONT AND REAR COVER 1
- ORIGINAL TRAY 2
- DOCUMENT FEED COMPONENTS 3
- PICK-UP ROLLER 3
- FEED BELT 4
- SEPARATION ROLLER 6
- ELECTRICAL COMPONENTS 7
- DF DRIVE BOARD 7
- ORIGINAL LENGTH SENSORS AND TRAILING EDGE SENSOR 8
- ORIGINAL SET, SEPARATION, SKEW CORRECTION AND SCANNING ENTRANCE SENSOR 9
- ORIGINAL WIDTH SENSORS 10
- REGISTRATION SENSOR 10
- ORIGINAL EXIT SENSOR 11
- DF POSITION SENSOR 12
- COVER SENSOR 12
- PICK-UP ROLLER HP AND ORIGINAL STOPPER HP SENSOR 13
- STAMP SOLENOID 14
- ORIGINAL FEED DRIVE 16
- ADF FEED MOTOR 16
- ADF INVERTER MOTOR 17
- ADF TRANSPORT MOTOR 17
- ADF PICK-UP MOTOR 18
- COVERS AND TRAY 1
DETAILED DESCRIPTIONS 19
- COMPONENT LAYOUT 19
- MECHANICAL COMPONENT LAYOUT 19
- ELECTRICAL COMPONENT LAYOUT 20
Sensors and Drive Components 20
Electrical Component Descriptions 21 - DRIVE LAYOUT 23
SM i B802/D630
ADF Feed Motor 24
ADF Transport Motor and ADF Inverter Motor 24
- BASIC OPERATION 25
- ORIGINAL SIZE DETECTION 25
- MIXED ORIGINAL SIZE MODE 27
Document length detection 27
Feed-in cycle 27
Normal feed-in 28 - PICK-UP AND SEPARATION 28
- SKEW CORRECTION 29
- SLIP DETECTION 30
- ORIGINAL TRANSPORT AND EXIT 31
Single-Sided Originals 31
Double-Sided Originals 31
Original Sensor 32 - CONDITIONS FOR JAM DETECTION 33
- COMPONENT LAYOUT 19
SERVICE TABLES 34
- DIP SWITCHES 34
READ THIS FIRST
Safety and Symbols
Replacement Procedure Safety

- Turn off the main power switch and unplug the machine before beginning any of the replacement procedures in this manual.
Symbols Used in this Manual
This manual uses the following symbols.: See or Refer to
: Screws
: Connector
: Clip ring
: E-ring
: Clamp
ARDF DF3010/ DF3070 (B802/D630)
REPLACEMENT AND ADJUSTMENT
COVERS AND TRAY
FRONT AND REAR COVER
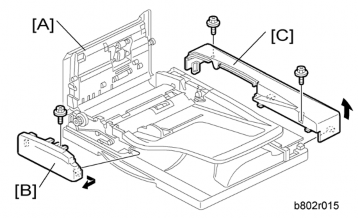
- Open the left cover [A].
- Front cover ( x 1, hook x 2)
[*]Rear cover [C] (x 2, hook x 2)
[*]ORIGINAL TRAY
- Open the left cover.
- Rear cover ( "Front and Rear Cover")
- Front cover ( "Front and Rear Cover")
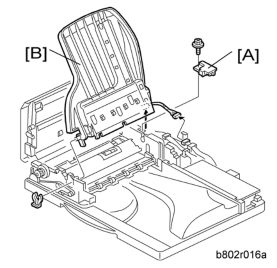
- Pivot cover [A] ( x 1)
- Original tray (x 1, x 1, x 2)
ARDF DF3010/ DF3070 (B802/D630)
[*]DOCUMENT FEED COMPONENTS
PICK-UP ROLLER
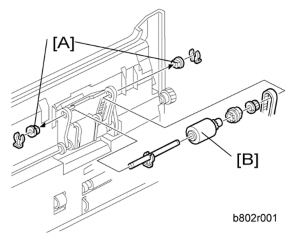
- Open the left cover.
- Bushings [A] ( x 1 each)
- Pick-up roller (gear x 1, one-way gear x 1)
[*]FEED BELT
- Open the left cover.
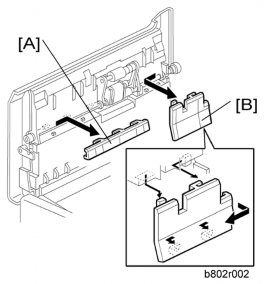
- Front feed unit cover [A]
- Rear feed unit cover (hook x 2)
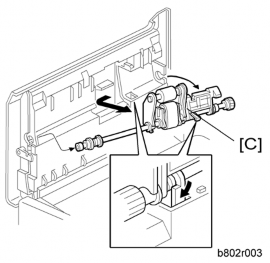
[*]Feed belt unit [C]
ARDF DF3010/ DF3070 (B802/D630)
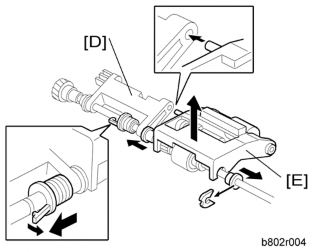
[*]Slide the tension plate [D] (hook)
[*]Belt unit cover [E] ( x 1)
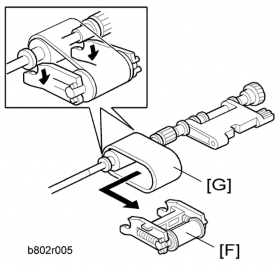
[*]Belt tension unit [F]
[*]Feed belt [G]
[*]SEPARATION ROLLER
- Open the left cover.
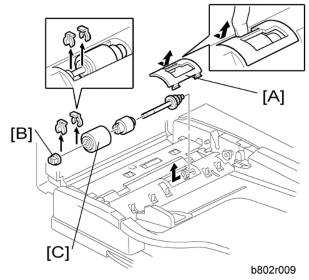
- Separation roller cover [A]
- Remove the bushing ( x 1).
[*]Slide the separation roller shaft to the front side, and then remove it.
[*]Separation roller [C] ( x 1)
ARDF DF3010/ DF3070 (B802/D630)
[*]ELECTRICAL COMPONENTS
DF DRIVE BOARD
- Rear cover ("Front and Rear Cover")
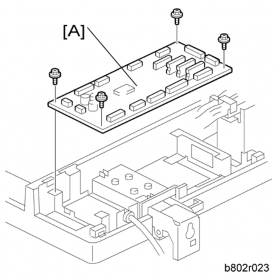
- DF drive board [A] ( x 4, all s)
- Rear cover ("Front and Rear Cover")
ORIGINAL LENGTH SENSORS AND TRAILING EDGE SENSOR
- Open the left cover.
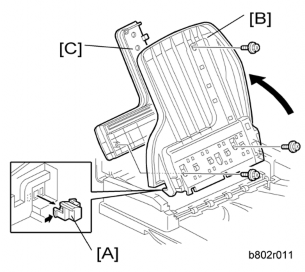
- Remove the tray stopper [A], while pushing the hook with a screw driver.
- Open the original tray .
[*]Original tray cover [C] ( x 3)
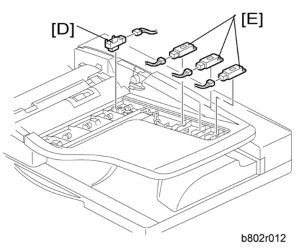
[*]Original trailing edge sensor [D]x 1, hook)
[*]Original length sensors [E]x 1 each, hook)
ARDF DF3010/ DF3070 (B802/D630)
[*]ORIGINAL SET, SEPARATION, SKEW CORRECTION AND SCANNING ENTRANCE SENSOR
- Open the left cover.
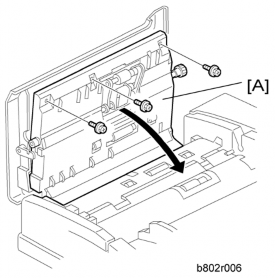
- Open the inner upper cover [A] (stepped screw x 3).
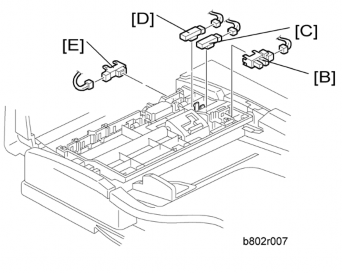
- Original set sensor ( x 1, hook)
[*]Separation sensor [C] ( x 1, hook)
[*]Skew correction sensor [D] ( x 1, hook)
[*]Scanning entrance sensor [E] ( x 1, hook)
[*]ORIGINAL WIDTH SENSORS
- Open the left cover.
- Open the inner upper cover ( " Original Set, Separation, Skew Correction and Registration Sensor").
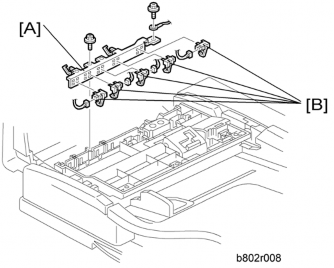
- Original width sensor bracket [A] ( x 2, ground cable x 1).
- Original width sensors
x 1 each, hook)

[*]REGISTRATION SENSOR
- Open the ARDF.
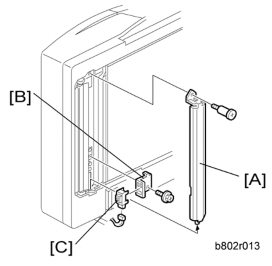
- White plate [A] (stud screw x 1)
- Registration sensor bracket ( x 1)
[*]Registration sensor [C] ( x 1)
ARDF DF3010/ DF3070 (B802/D630)
[*]ORIGINAL EXIT SENSOR
- Open the left cover.
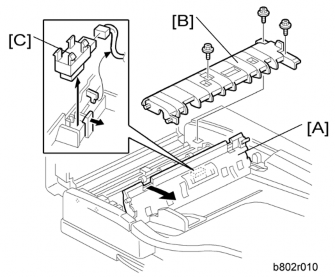
- Open the feed-in guide plate [A].
- Guide plate ( x 2, stepped screw x 1; front side)
[*]Original exit sensor [C] ( x 1, hook)
[*]DF POSITION SENSOR
- Rear cover ( "Front and Rear Cover")
- ARDF drive board ( "ARDF Drive Board")
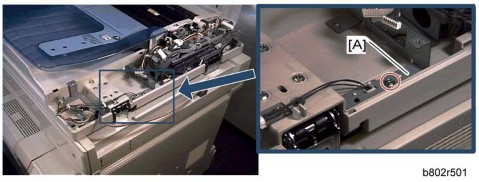
- DF position sensor bracket [A] ( x 1)
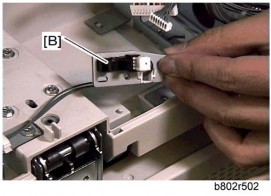
- DF position sensor ( x 1, hook)
[*]COVER SENSOR
- Open the left cover.
- Rear cover ( "Front and Rear Cover")
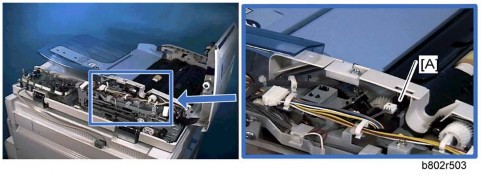
- Cover sensor [A] ( x 1, hook)
ARDF DF3010/ DF3070 (B802/D630)
[*]PICK-UP ROLLER HP AND ORIGINAL STOPPER HP SENSOR
- Open the left cover.
- Rear cover ( "Front and Rear Cover")
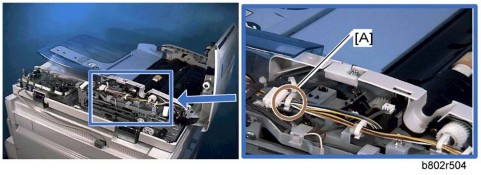
- Release the clamp [A] ( x 1), and then slide the harnesses away.
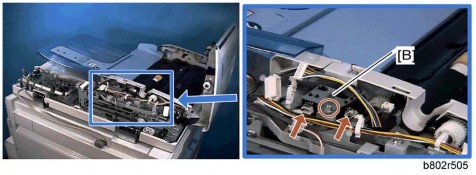
- Sensor bracket ( x 1, x 2)
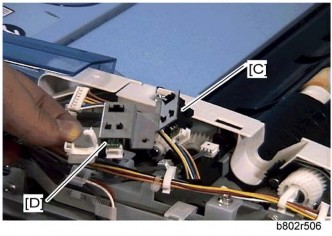
[*]Pick-up roller HP sensor [C] (hook)
[*]Original stopper HP sensor [D] (hook)
[*]STAMP SOLENOID
- Open the left cover.
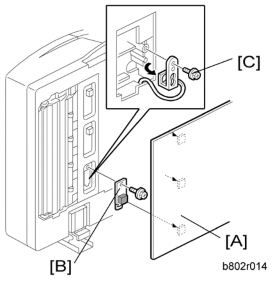
- Remove the platen plate [A].
- Stamp solenoid cover ( x 1)
[*]Remove the screw [C] ( x 1).

- You cannot remove the stamp solenoid at this time.
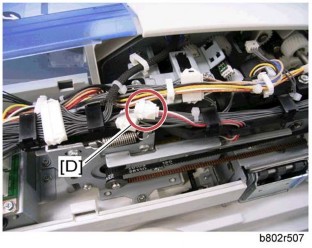
[*]Disconnect the stamp solenoid harness [D].
[*]ADF feed motor ( "ADF Feed Motor")
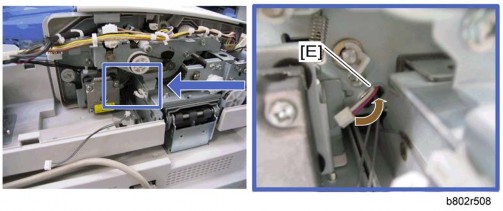
ARDF DF3010/ DF3070 (B802/D630)
[*]Put the stamp solenoid harness into the cutout [E].
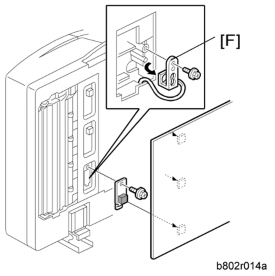
[*]Pull out the stamp solenoid [F]
- Open the left cover.
[*]ORIGINAL FEED DRIVE
ADF FEED MOTOR
- Rear cover ( "Front and Rear Cover")
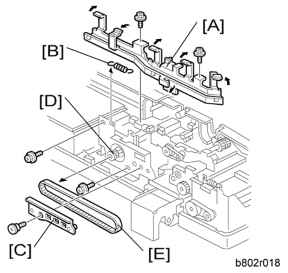
- Harness guide [A] ( x 2, all s, all s)
- Remove the spring .
[*]Stay bracket [C] (stepped screw x 1)
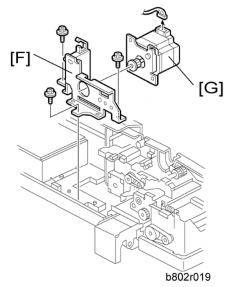
[*]Slide the feed motor gear [D] to the left side (seen from the front of the machine), and then remove the timing belt [E].
[*]ADF feed motor bracket [F] ( x 3)
[*]ADF feed motor [G] ( x 1)
ARDF DF3010/ DF3070 (B802/D630)
[*]ADF INVERTER MOTOR
- ADF feed motor ( " ADF Feed Motor")
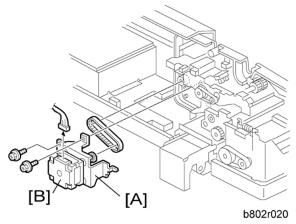
- ADF inverter motor bracket [A] ( x 2, x 1, timing belt)
- ADF inverter motor ( x 4)
[*]ADF TRANSPORT MOTOR
- Rear cover ( "Front and Rear Cover")
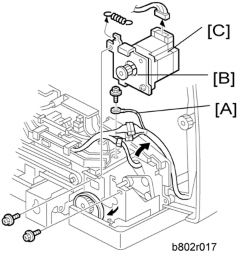
- Ground cable [A] ( x 1)
- ADF transport motor bracket ( x 2, x 1)
[*]ADF transport motor [C] ( x 2)
[*]ADF PICK-UP MOTOR
- Rear cover ( "Front and Rear Cover")
[*]Rear cover ( "Front and Rear Cover")
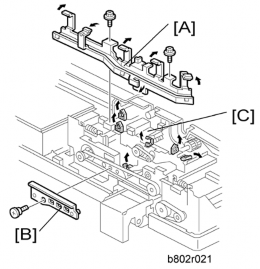
[*]Harness guide [A] ( x 2, all s, all s)
[*]Stay bracket (stepped screw x 1)
[*]Release 6 clamps on the ADF pick-up motor bracket [C] ( x 6).
ADF pick-up motor bracket [D] ( x 3,
5. x 1)
6. ADF pick-up motor [E] ( x 2, x 1, timing belt)
ARDF DF3010/ DF3070 (B802/D630)
DETAILED DESCRIPTIONS
COMPONENT LAYOUT
- Original Width Sensor
- Skew Correction Roller
- Skew Correction Sensor
- Separation Sensor
- Feed Belt
- Separation Roller
- Original Set Sensor
- Pick-up Roller
- Original Length Sensor 1
- Original Length Sensor 2
MECHANICAL COMPONENT LAYOUT
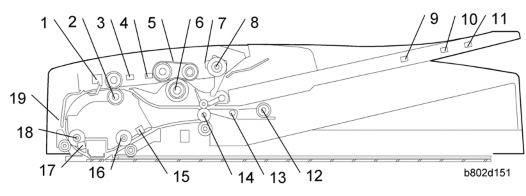
- Original Length Sensor 3
- Inverter Roller
- Junction Gate
- Exit Roller
- Original Exit Sensor
- Transport Roller
- Registration Sensor
- Registration Roller
- Scanning Entrance Sensor
ELECTRICAL COMPONENT LAYOUT
- Original Length Sensor 2
- Original Length Sensor 4
- DF Drive Board
- Original Trailing Edge Sensor
- Original Set Sensor
- Stamp Solenoid
- Separation Sensor
- Original Exit Sensor
- Junction Gate Solenoid
- Registration Sensor
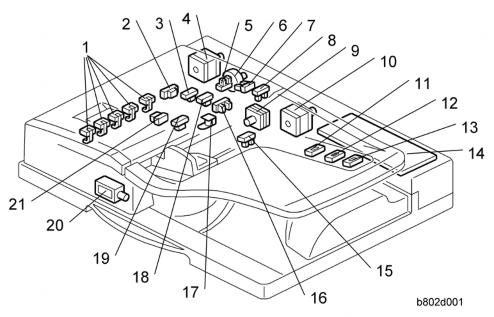
- Original Width Sensors
- Scanning Entrance Sensor
- Skew Correction Sensor
- ADF Transport Motor
- Left Cover Sensor
- Pick-up Motor
- Pick-up Roller HP Sensor
- Original Stopper HP Sensor
- ADF Inverter Motor
- ADF Feed Motor
- Original Length Sensor 1
Electrical Component Descriptions
Symbol Name Function Index No. Motors
-
ADF FeedDrives the feed belt, separation, pick-up, and reverse table rollers.
10- ADF Transport Drives the transport and exit rollers 4 - ADF Inverter Drives the Inverter rollers 9 - Pick-up Motor Moves the pick-up roller up and down. 6 Sensors - DF Position Detects whether the DF is lifted or not.
-
Skew CorrectionDetects the leading edge of the original to turn off the DF feed and transport motors.
3
-
RegistrationDetects the original exposure timing, and checks for original misfeeds.
21
-
Cover SensorDetects whether the feed-in cover is opened or not.
4
-Original Width Sensor - S
Detects the original width - S.
1
-Original Width Sensor - M
Detects the original width - M.
1
-Original Width Sensor - L
Detects the original width - L.
1
-Original Width Sensor - LL
Detects the original width - LL.
1
-Original Length - S
Detects the original length - S.
11ARDF DF3010/ DF3070 (B802/D630)
-Original Length - M
Detects the original length - M.
12- Original Length - L Detects the original length - L. 13 - Original Set Detects if an original is on the feed table. 16
-
Original ExitDetects the leading edge of the original to turn on the junction gate solenoid and checks for original misfeeds.
Detects the trailing edge of the original to turn off the transport and feed motor and junction gate solenoid.
In single-sided mode, used to detect original misfeeds.
19
-
Original Trailing Edge SensorDetects the trailing edge of the last original to stop copy paper feed and to turn off the transport motor, and checks for original misfeeds.
15
-
Separation SensorThe machine uses this sensor to check if the original has slipped during feed-in, to make sure that original feed starts at the correct time.
18Solenoids - Stamp Energizes the stamper to mark the original. 17 - Junction Gate Opens and closes the junction gate. 20 PCBs
-
DF DriveInterfaces the sensor signals with the copier, and transfers the magnetic clutch, solenoid and motor drive signals from the copier.
14
DRIVE LAYOUT

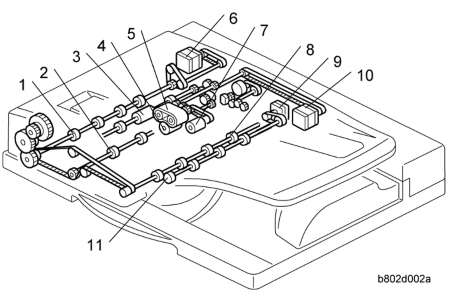
- Registration Roller
- Transport Roller
- Skew Correction Roller
- Separation Roller
- Feed Belt
- ADF Transport Motor
- Pick-up Roller
- Exit Roller
- ADF Inverter Motor
- ADF Feed Motor
- Inverter Roller
Last edited:
