HOME PAGE | < Previous | Contents | Next >
1.6.1 INSTALLATION PROCEDURE
This unit allows a machine without the FAX unit installed (“Client-side Machine”) to send and receive faxes via a machine with the FAX unit installed (“Remote Machine”).
Requirements:
Up to six machines can be registered as the Client-side Machines.
Machines that have the FAX unit installed cannot be used as the Client-side Machine.
Only one machine can be registered as the Remote Machine.
Firmware for this unit: “aics” (software number: D1655759 forType M3/ D1665759 for Type M4)
Remote Fax transmissions are possible on a G3 line.
The remote fax function does not support User Code Authentication. Disable the User Code Authentication on the Remote machine.
Use this function to check the contents of a file that is stored in memory and not yet sent. Also, use this function to cancel a transmission from the Client-side Machine.
Installing the application
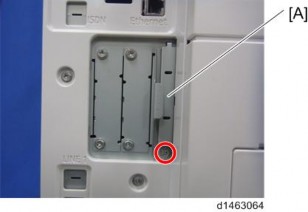
1. Only for D148/D149/D150, remove the slot cover.
2. Remove the SD card slot cover from the SD card slots [A] ![]() x 1). D148/D149/D150:
x 1). D148/D149/D150:
D146/D147:

3. Insert the SD card (Fax Connection Unit Type M3 for D146/D147 or M4 for D148/D149/D150) in SD slot 2 (lower) with its label face [B] towards the front of the machine. Then push it slowly into SD slot 2 (lower) until you hear a click.
4. Plug in, and then turn on the machine.
5. Move the Fax Connection Unit Type M3 (for D146/D147) or (M4 for D148/D149/D150) application from the SD card in SD slot 2 (lower) to the SD card in SD slot 1 (upper) with SP5-873-001.
6. Turn off the machine.
7. Remove the SD card from SD slot 2 (lower), and then keep it in a safe place (see “SD Card Appli Move” in the manual for the main frame).
8. Attach the SD-card slot cover, and then turn on the machine ![]() x 1)
x 1)
9. Make sure that the machine can recognize the option (See ‘Self-Diagnosis Report’ and check whether the aics (D1655759 for Type M3/ D1665759 for Type M4) is listed in [Loading Program].)
Registering the Remote Machine
![]()
Only one machine can be registered as the Remote Machine.
On the Client-side Machine(s):
1. Press the [User Tools/Counter] key on the operation panel
2. Press [System Settings] to select.
3. Press [Administrator Tools] to select.
4. Press [Program/Change/Delete Remote Machine] to select.
5. Enter the IP address or host name of the Remote Machine.
6. Press [Set] to set after “connection test”.
7. Press [Exit] to exit from the set-up procedure.
Registering the Client-side Machine(s)
![]()
Up to six machines can be registered as the Client-side Machines.
On the Remote Machine:
1. Press the [User Tools/Counter] key on the operation panel
2. Press [System Settings] to select.
3. Press [Administrator Tools] to select.
4. Press [Program//Change/Delete Remote Machine] to select.
5. Enter the IP address or host name of the Client-side Machines.
6. Press [Set] to set after “connection test”.
Configuring the Remote Reception Settings
Do the following procedure to enable the Client-side Machine(s) to receive faxes via the Remote Machine. You can forward or route received documents per line or special sender.
![]()
By performing procedures #1-3 above, the Client-side Machines can send faxes via the Remote Machine. The procedures shown below are necessary to enable the Client-side Machines to receive faxes.
On the Remote Machine:
1) If you use "Remote Reception Setting per Line"
1. Press [Facsimile Features] to select.
2. Press [Remote Reception Setting per Line] in [Reception Settings] to select.
3. Enter an IP address or a host name of the client-side machine to connect.
4. Press [Set], and [Exit] to exit from the setting.
2) If you use "Remote Reception per Sender"
1. Press [Facsimile Features] to select.
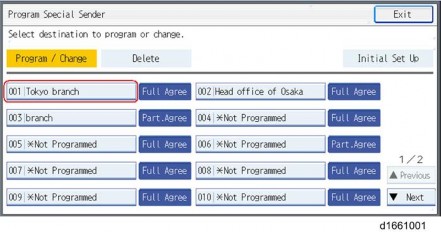
2. Press [Program Special Sender] in [Reception Settings] to select.
3. Select the Special Sender.
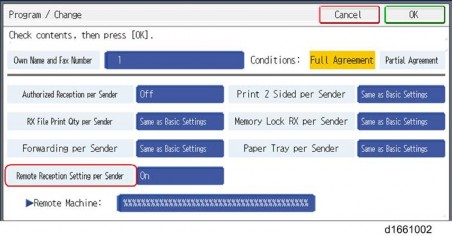
4. Press [Remote Reception Setting per Sender] to select.
5. Press [On] and [Remote Machine] to select.
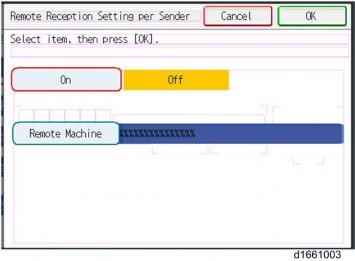
6. Enter an IP address or a host name of the client-side machine to connect.
7. Press [OK] to exit from the setting.
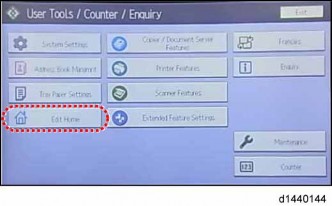
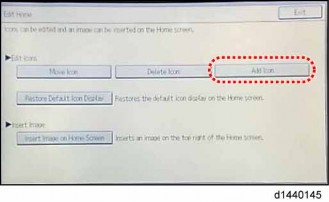
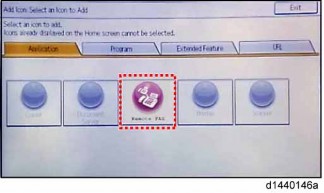
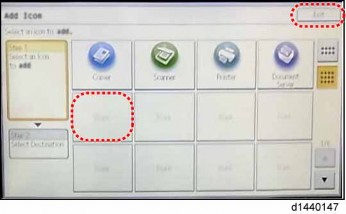
Remote Fax Icon Addition for Remote Machine
This procedure allows the remote fax icon to appear on the home screen of the operation panel.
On both the Remote Machine and the Client-side Machines:
1. Press [User Tools].
2. Press [Edit Home].
3. Press [Add Icon].
4. Press [Remote Fax].
5. Press a [Blank] to set a location for the remote fax icon.
6. Press [Exit] to exit from the set-up procedure.