HOME PAGE | < Previous | Contents | Next >
Paper Feed Unit Installation (D580)
2.4 PAPER FEED UNIT INSTALLATION (D580)
2.4.1 ACCESSORY CHECK
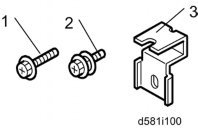
Check the quantity and condition of the accessories against the following list.
No. | Description | Q'ty |
1 | Screw (M4x10) | 2 |
2 | Screw with Spring Washer (M4x10) | 1 |
3 | Securing Bracket | 2 |

2.4.2 INSTALLATION PROCEDURE
![]()
Unplug the machine power cord before starting the following procedure.
The handles of the main machine for lifting must be inserted inside the machine and locked unless these handles are used for the installation or relocation of the main machine.
You need two or more persons to lift the copier. The copier is highly unstable when lifted by one person, and may cause human injury or property damage.

Paper Feed Unit Installation (D580)
1. Remove all tape on the paper feed unit.
Installation
Installation
Installation
2. Remove the paper trays and remove all tape and padding.

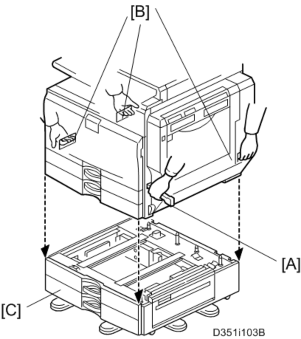
3. Grasp the handle [A] and grips [B] of the machine.
4. Lift the copier and install it on the paper feed unit [C].
![]()
You need two or more persons to lift the copier.
![]()
Hold the handle and grips of the machine when you lift and move the machine.

5. Remove trays 1 and 2 of the machine.
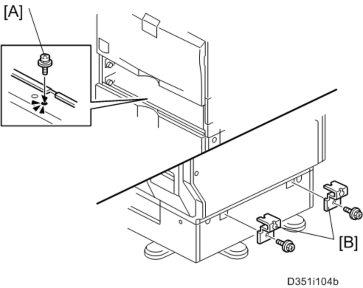
6. Fasten the spring washer screw [A].
7. Reinstall all trays.
Paper Feed Unit Installation (D580)
8. Attach the securing brackets [B] ![]() x 1 each; M4x10).
x 1 each; M4x10).

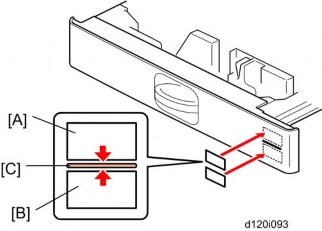
9. Attach the appropriate paper tray number decal [A] and paper size decal [B] to the line [C] on each tray of the paper feed unit.
![]()
The paper tray number and size sheet is in the accessory box of the main machine.
10. Lock the caster stoppers for the front two casters under the paper feed unit.
11. Load paper into the paper feed unit.
12. Turn on the main power switch of the machine.
13. Check the paper feed unit operation and copy quality.