HOME PAGE | < Previous | Contents | Next >
BOOKLET FINISHER SR3170 / FINISHER SR3160 (D688/D689)
BOOKLET FINISHER SR3170 / FINISHER SR3160 (D688/D689)
BOOKLET FINISHER SR3170 / FINISHER SR3160 (D688/D689)
1.1 EXTERIOR COVERS
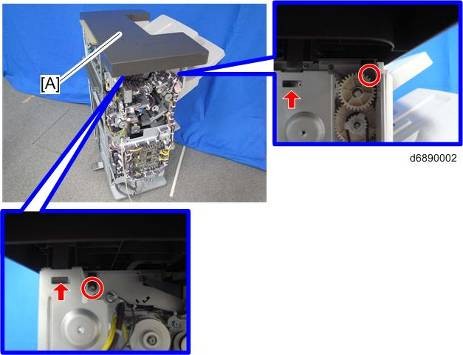
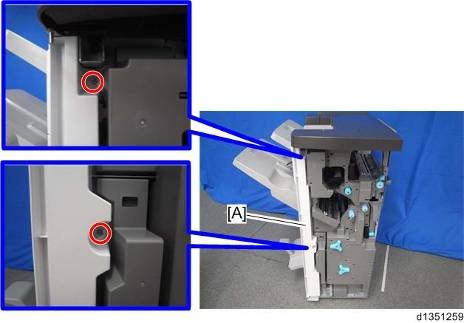
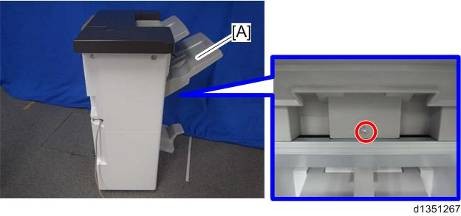
1.1.1 REAR UPPER COVER, REAR LOWER COVER, UPPER COVER
1. Rear upper cover [A] ![]() ×2)
×2)
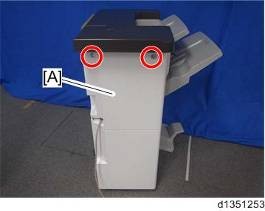
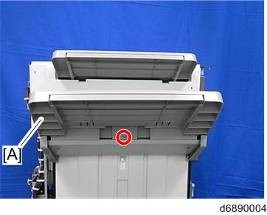
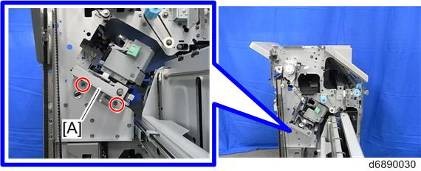
2. Rear lower cover [A] ![]() ×2)
×2)
3.
Exterior Covers
4.
![]()
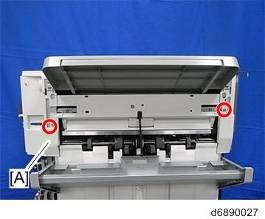
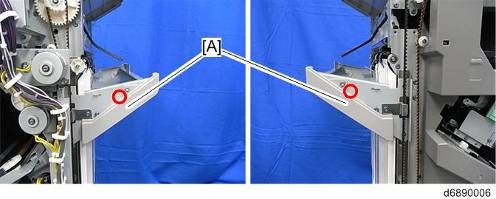
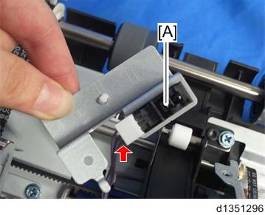
Check the positions of the bosses and hooks before removing the upper cover.
Exterior Covers
SM
3
D688/D689
D688/D689
D688/D689
3
3
SM
SM
Exterior Covers
Exterior Covers
BOOKLET FINISHER SR3170 / FINISHER SR3160 (D688/D689)
BOOKLET FINISHER SR3170 / FINISHER SR3160 (D688/D689)
BOOKLET FINISHER SR3170 / FINISHER SR3160 (D688/D689)
Exterior Covers
1.1.2 FRONT COVER, FRONT LEFT SIDE COVER
1. Remove the following covers (page 1 "Rear Upper Cover, Rear Lower Cover, Upper Cover")
Rear Upper Cover
Rear Lower Cover,
Upper Cover
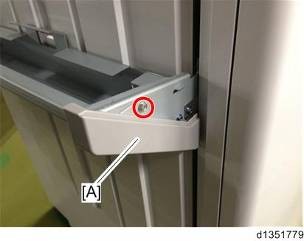
2. Open the front cover [A].
3. Release the Shaft bracket [B] ( upper direction) ![]() ×1)
×1)
4. Front cover [A].
5.
Exterior Covers
BOOKLET FINISHER SR3170 / FINISHER SR3160 (D688/D689)
BOOKLET FINISHER SR3170 / FINISHER SR3160 (D688/D689)
BOOKLET FINISHER SR3170 / FINISHER SR3160 (D688/D689)
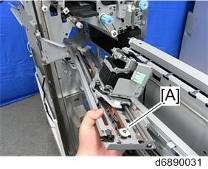
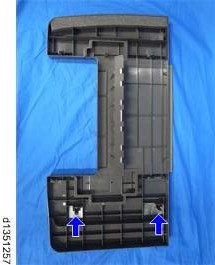
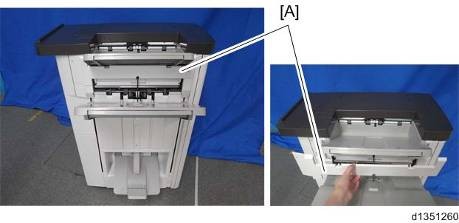
1.1.3 PAPER EXIT COVER
1. Paper exit cover [A] (hook×4)
![]()
Check the positions of the bosses and hooks before removing the paper exit cover.
![]()
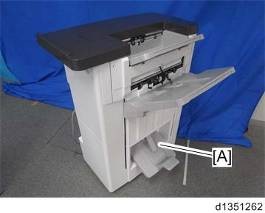
1.1.4 LOWER TRAY
1. Lower tray [A]
Exterior Covers
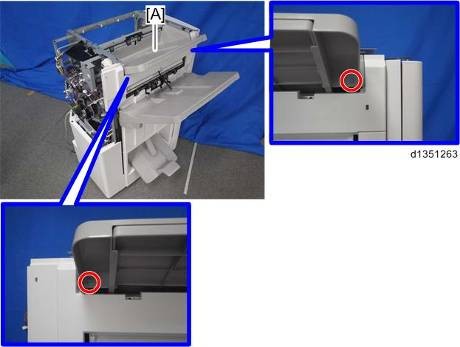
1.1.5 PROOF TRAY
1. Remove the following covers (page 1 "Rear Upper Cover, Rear Lower Cover, Upper Cover")
Rear upper cover
Upper cover
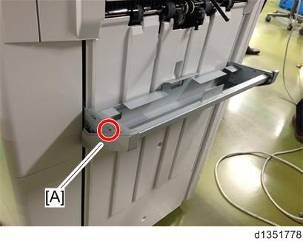
2. Proof tray [A] ![]() ×2)
×2)
1.1.6 UPPER TRAY
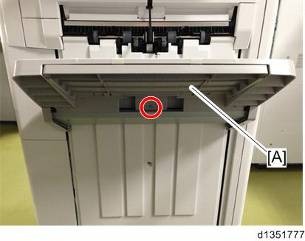
1. Upper tray [A] ![]() ×1)
×1)
1.1.7 END FENCE (D688 ONLY)
1. Remove the following covers (page 4 "Front Cover, Front Left Side Cover")
Front cover
Front left side cover
Exterior Covers
BOOKLET FINISHER SR3170 / FINISHER SR3160 (D688/D689)
BOOKLET FINISHER SR3170 / FINISHER SR3160 (D688/D689)
BOOKLET FINISHER SR3170 / FINISHER SR3160 (D688/D689)
Rear upper cover
2. Upper tray [A] ![]() ×1)
×1)
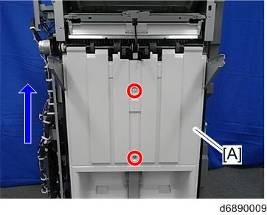
3. Proof lower cover [A] (hook×4)
4.
5. Mold bracket (front, rear) [A] ![]() ×2)
×2)
Exterior Covers
6. Shift tray bracket (front, rear) [A] ![]() ×4)
×4)
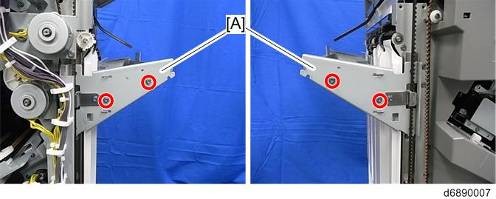
7. Shift tray bracket [A].
8.
Exterior Covers
BOOKLET FINISHER SR3170 / FINISHER SR3160 (D688/D689)
BOOKLET FINISHER SR3170 / FINISHER SR3160 (D688/D689)
BOOKLET FINISHER SR3170 / FINISHER SR3160 (D688/D689)
1.1.8 LEFT COVER (D689 ONLY)
1. Upper tray [A] ![]() ×1)
×1)
2. Rear mold bracket [A] ![]() ×1)
×1)
3. Front mold bracket [A] ![]() ×1)
×1)
4. Shift tray bracket [A] ![]() ×4)
×4)
Exterior Covers
5. Left cover [A] ![]() ×3)
×3)
Boards
BOOKLET FINISHER SR3170 / FINISHER SR3160 (D688/D689)
BOOKLET FINISHER SR3170 / FINISHER SR3160 (D688/D689)
BOOKLET FINISHER SR3170 / FINISHER SR3160 (D688/D689)
1.2 BOARDS
1.2.1 MAIN BOARD
1. Remove the following covers (page 1 "Rear Upper Cover, Rear Lower Cover, Upper Cover")
Rear upper cover
Rear lower cover
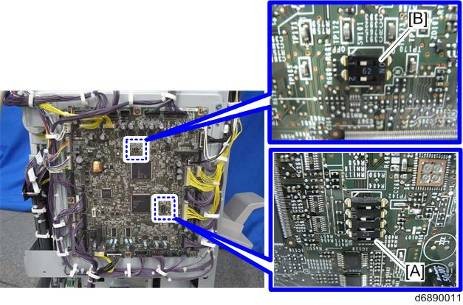
2. Main board [A] ![]() ×8,
×8, ![]() ×all)
×all)
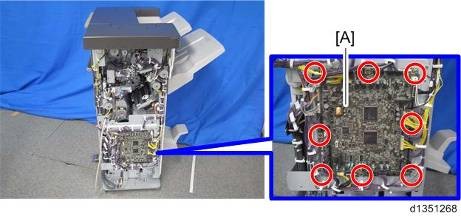
When replacing the main board
This board has two blocks of dip switches. When you reinstall the main board, follow the procedure below regarding the dip switch settings.
1. Check the settings of dip switch [A] on the old main board.
2. Replace the main board.
3. Change the settings of dip switch [A] on the new main board to match the settings on the old main board.
4. Make sure the switches of dip switch [B] on the new main board are all OFF.
Boards
Main Unit (Motor)
BOOKLET FINISHER SR3170 / FINISHER SR3160 (D688/D689)
BOOKLET FINISHER SR3170 / FINISHER SR3160 (D688/D689)
BOOKLET FINISHER SR3170 / FINISHER SR3160 (D688/D689)
1.3 MAIN UNIT (MOTOR)
1.3.1 CORNER STAPLING UNIT
1. Remove the following covers (page 4 "Front Cover, Front Left Side Cover")
Front door
Front left side cover
End fence
Rear upper cover
Rear lower cover
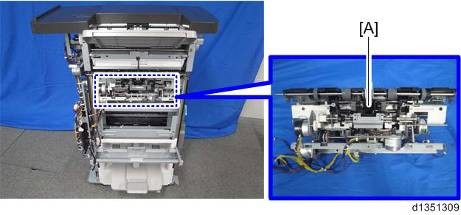
2. Pull out the booklet unit.
3. Inner upper cover [A] ![]() ×2)
×2)
![]()
Disconnect the harness from the back side of the inner upper cover when you remove the inner upper cover.
Main Unit (Motor)
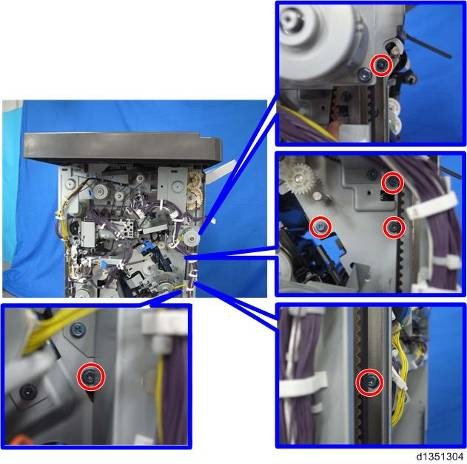
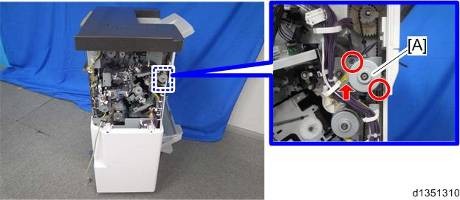
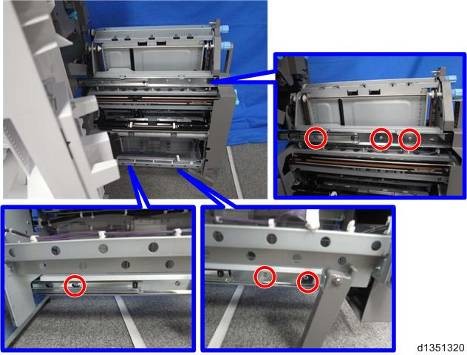
4. Remove the screws from the front side of the finisher ![]() ×7)
×7)
5. Remove the bushing [A] from the front side of the finisher ![]() ×1)
×1)
6.
Main Unit (Motor)
BOOKLET FINISHER SR3170 / FINISHER SR3160 (D688/D689)
BOOKLET FINISHER SR3170 / FINISHER SR3160 (D688/D689)
BOOKLET FINISHER SR3170 / FINISHER SR3160 (D688/D689)
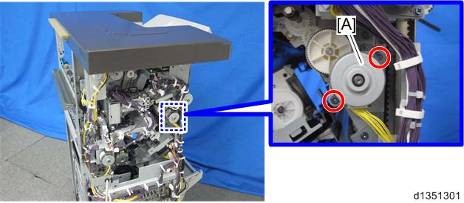
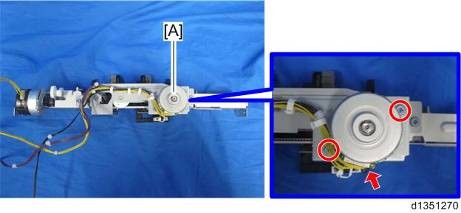
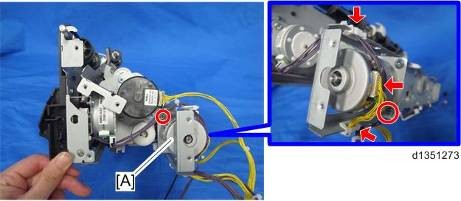
7. Pressure release motor bracket [A] ![]() ×2)
×2)
8. Gear [A] ![]() ×1, belt×1)
×1, belt×1)
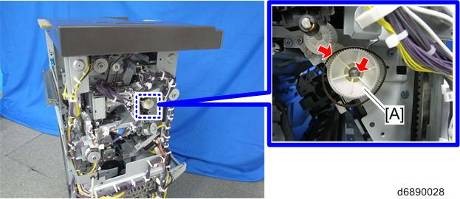
9. Pulley [A] (hook×1)
10.
Main Unit (Motor)
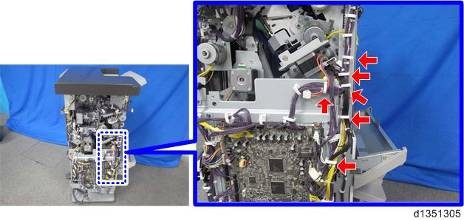
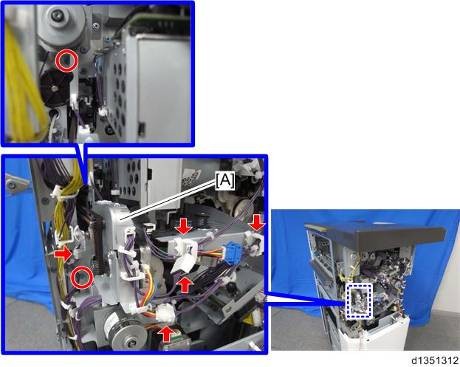
11. Remove the clamps shown below ![]() ×6)
×6)
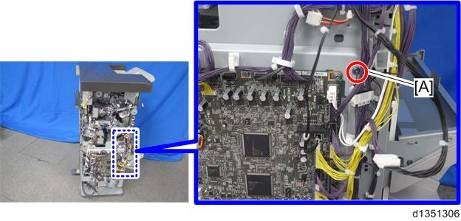
12. Remove the ground wire [A] of the main board ![]() ×1)
×1)
BOOKLET FINISHER SR3170 / FINISHER SR3160 (D688/D689)
BOOKLET FINISHER SR3170 / FINISHER SR3160 (D688/D689)
BOOKLET FINISHER SR3170 / FINISHER SR3160 (D688/D689)
Main Unit (Motor)
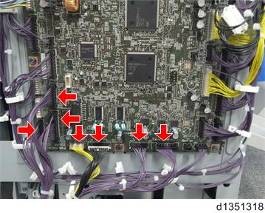
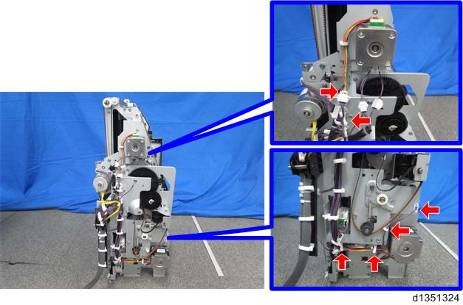
13. Disconnect the connectors shown below ![]() ×7)
×7)
14. Pull out the harnesses disconnected in step 13 to the right side of the finisher through the hole [A].
15. Remove the harness from the clamps ![]() ×4)
×4)
16. Remove the corner stapling unit [A] from between the front and left plate.
Main Unit (Motor)
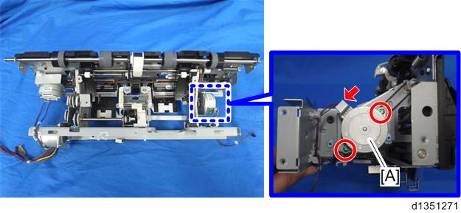
1.3.2 PAPER EXIT GATE MOTOR
1. Corner stapling unit (page 13 "Corner Stapling Unit")
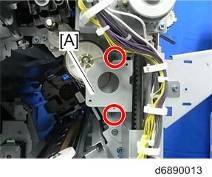
2. Stapler bracket [A] ![]() ×3,
×3, ![]() ×2)
×2)
3.
Main Unit (Motor)
BOOKLET FINISHER SR3170 / FINISHER SR3160 (D688/D689)
BOOKLET FINISHER SR3170 / FINISHER SR3160 (D688/D689)
BOOKLET FINISHER SR3170 / FINISHER SR3160 (D688/D689)
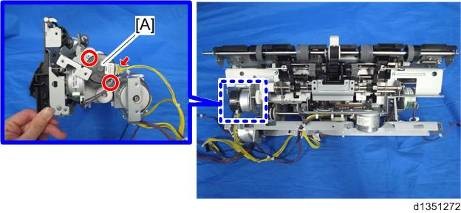
1.3.3 LEADING EDGE GUIDE MOTOR
1. Corner stapling unit (page 13 "Corner Stapling Unit")
2. Stapler bracket [A] ![]() ×3,
×3, ![]() ×1)
×1)
3.
1.3.4 TRAILING EDGE PRESSURE PLATE MOTOR
1. Corner stapling unit (page 13 "Corner Stapling Unit")
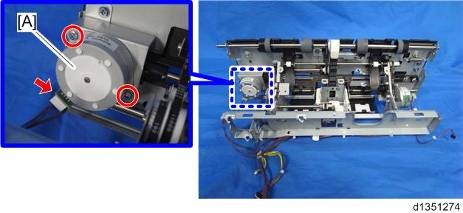
2. Trailing edge pressure plate motor [A] ![]() ×2,
×2, ![]() ×1)
×1)
Main Unit (Motor)
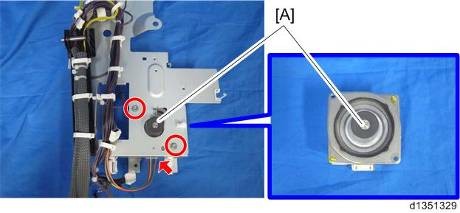
1.3.5 STACKING ROLLER MOTOR
1. Rear upper cover (page 1 "Rear Upper Cover, Rear Lower Cover, Upper Cover")
2. Stacking roller motor [A] ![]() ×2,
×2, ![]() ×1)
×1)
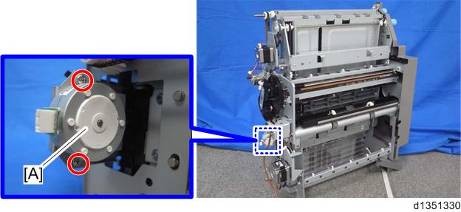
1.3.6 FEED OUT MOTOR
1. Corner stapling unit (page 13 "Corner Stapling Unit")
2. Feed out motor [A] ![]() ×2,
×2, ![]() ×1,
×1, ![]() ×2)
×2)
Main Unit (Motor)
BOOKLET FINISHER SR3170 / FINISHER SR3160 (D688/D689)
BOOKLET FINISHER SR3170 / FINISHER SR3160 (D688/D689)
BOOKLET FINISHER SR3170 / FINISHER SR3160 (D688/D689)
1.3.7 JOGGER MOTOR
1. Corner stapling unit (page 13 "Corner Stapling Unit")
2. Stapler bracket [A] ![]() ×3,
×3, ![]() ×1)
×1)

3. Feed out motor (page 20 "Feed Out Motor")
4. Jogger motor [A] ![]() ×2,
×2, ![]() ×1)
×1)
Main Unit (Sensor)
1.4 MAIN UNIT (SENSOR)
1.4.1 SHIFT TRAY PAPER SENSOR
1. Corner stapling unit (page 13 "Corner Stapling Unit")
2. Stapler bracket [A] ![]() ×3,
×3, ![]() ×1)
×1)
3.
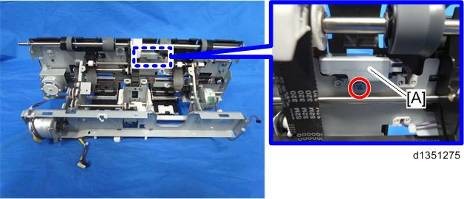
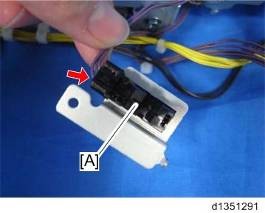
4. Shift tray paper sensor [A] ![]() ×1,
×1, ![]() ×1)
×1)

Main Unit (Sensor)
BOOKLET FINISHER SR3170 / FINISHER SR3160 (D688/D689)
BOOKLET FINISHER SR3170 / FINISHER SR3160 (D688/D689)
BOOKLET FINISHER SR3170 / FINISHER SR3160 (D688/D689)
1.4.2 TRAILING EDGE PRESSURE PLATE HP SENSOR
1. Corner stapling unit (page 13 "Corner Stapling Unit")
2. Stapler bracket [A] ![]() ×3,
×3, ![]() ×1)
×1)

3. Turn back the stapler bracket, and remove the trailing edge pressure plate HP sensor bracket [A] ![]() ×1)
×1)
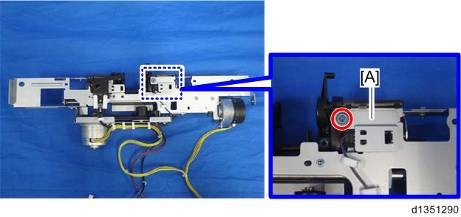
4. Trailing edge pressure plate HP sensor [A] ( ![]() ×1)
×1)
Main Unit (Sensor)
1.4.3 STACKING ROLLER HP SENSOR
1. Corner stapling unit (page 13 "Corner Stapling Unit")
2. Stapler bracket [A] ![]() ×3,
×3, ![]() ×1)
×1)
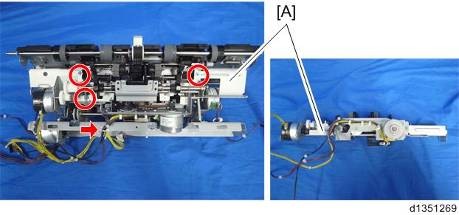
3. Turn back the stapler bracket, and remove the paper exit gate motor bracket [A] ![]() ×1,
×1,
![]()
×1)
4.
5.
Main Unit (Sensor)
SM
25
D688/D689
D688/D689
D688/D689
25
25
SM
SM
Main Unit (Sensor)
Main Unit (Sensor)
BOOKLET FINISHER SR3170 / FINISHER SR3160 (D688/D689)
BOOKLET FINISHER SR3170 / FINISHER SR3160 (D688/D689)
BOOKLET FINISHER SR3170 / FINISHER SR3160 (D688/D689)
Main Unit (Sensor)
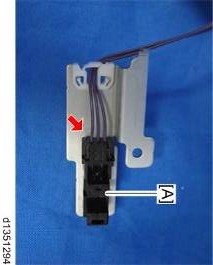
1.4.4 STAPLE TRAY PAPER SENSOR
1. Corner stapling unit (page 13 "Corner Stapling Unit")
2. Stapler bracket [A] ![]() ×3,
×3, ![]() ×1)
×1)
3.
4.
Booklet Unit
BOOKLET FINISHER SR3170 / FINISHER SR3160 (D688/D689)
BOOKLET FINISHER SR3170 / FINISHER SR3160 (D688/D689)
BOOKLET FINISHER SR3170 / FINISHER SR3160 (D688/D689)
1.5 BOOKLET UNIT
1.5.1 BOOKLET UNIT
1. Remove the following covers (page 1 "Rear Upper Cover, Rear Lower Cover, Upper Cover")
Rear Upper Cover
Rear Lower Cover
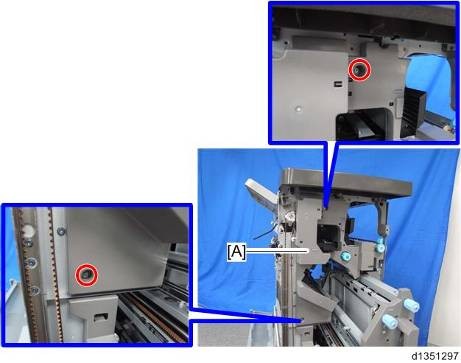
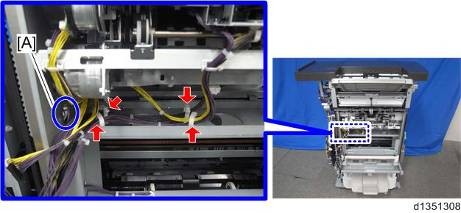
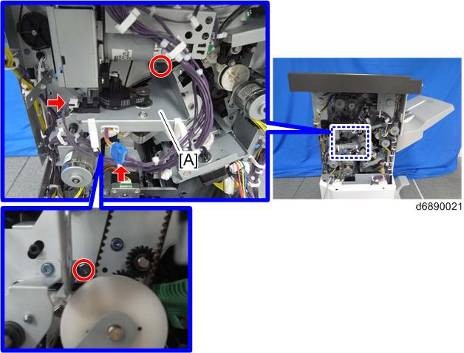
2. Remove the ground wire [A] in the left lower side of the main unit ![]() ×1)
×1)
3.
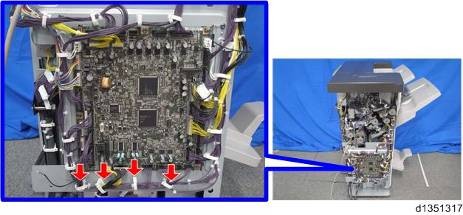
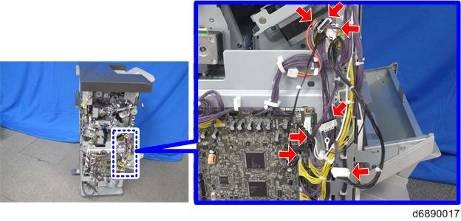
4. Disconnect the 7 connectors of the booklet unit from the main board as shown below ![]() ×7)
×7)
Booklet Unit
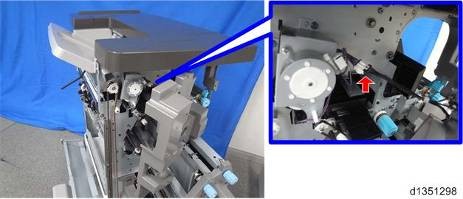
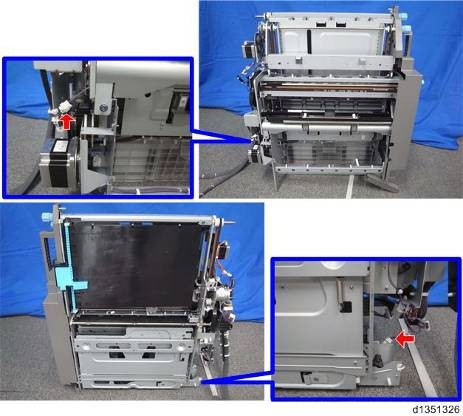
5. Open the front door [A] and pull out the stapling unit [B].
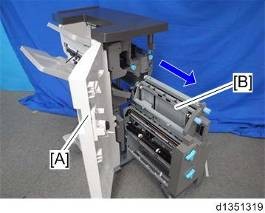
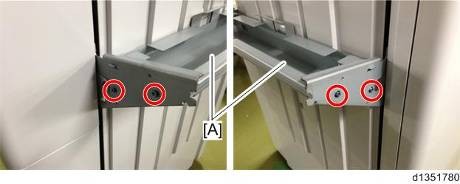
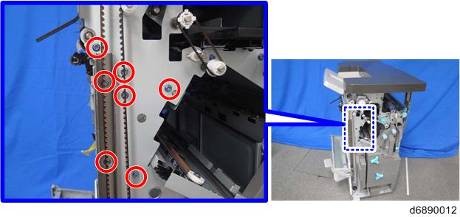
6. Remove the screws that hold the finisher and booklet unit. ![]() ×6)
×6)
Booklet Unit
BOOKLET FINISHER SR3170 / FINISHER SR3160 (D688/D689)
BOOKLET FINISHER SR3170 / FINISHER SR3160 (D688/D689)
BOOKLET FINISHER SR3170 / FINISHER SR3160 (D688/D689)
1.5.2 PRESS FOLDING MOTOR
1. Booklet unit (page 27 "Booklet unit")
2. Remove the bracket [A] from the booklet unit ![]() ×1,
×1, ![]() ×1)
×1)
3.
4. Loosen the screw [B] of the belt holding bracket, and then loosen the press folding motor belt [C].
5.
Booklet Unit
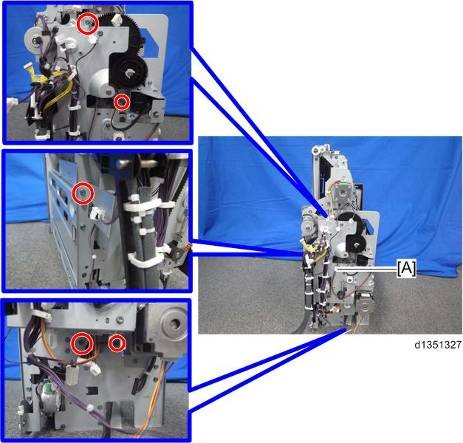
6. Disconnect the connectors shown below ![]() ×11)
×11)
7.
8. Press folding motor bracket [A] ![]() ×5)
×5)
BOOKLET FINISHER SR3170 / FINISHER SR3160 (D688/D689)
BOOKLET FINISHER SR3170 / FINISHER SR3160 (D688/D689)
BOOKLET FINISHER SR3170 / FINISHER SR3160 (D688/D689)
Booklet Unit
9. Remove the spring [B] from the press folding motor bracket [A] ![]() ×1, spring×1)
×1, spring×1)
10. Remove the press folding motor [A] ( ×2, ![]() ×1)
×1)
Booklet Unit
1.5.3 BOOKLET JOGGER MOTOR
1. Booklet unit (page 27 "Booklet unit")
2. Press folding motor bracket.
3. Booklet Jogger Motor [A] ![]() ×2)
×2)
Punch Unit
BOOKLET FINISHER SR3170 / FINISHER SR3160 (D688/D689)
BOOKLET FINISHER SR3170 / FINISHER SR3160 (D688/D689)
BOOKLET FINISHER SR3170 / FINISHER SR3160 (D688/D689)
1.6 PUNCH UNIT
The punch unit is already adjusted in the factory, so you don’t need to adjust it. When you need to replace the parts of the punch unit, replace the whole unit.
![]()
Do not disassemble the punch unit. This unit is precisely adjusted in the factory.
Do not drop or give a shock to the unit when you replace it. The unit could be damaged.
1. Remove the following covers (page 1 "Rear Upper Cover, Rear Lower Cover, Upper Cover")
Rear Upper Cover
Rear Lower Cover
2. Registration sensor bracket [A] ![]() ×2,
×2, ![]() ×3,
×3, ![]() ×2)
×2)
3. Stepper motor bracket [A] ![]() ×2,
×2, ![]() ×2)
×2)
Punch Unit
4. Pull out the punch unit [A] ![]() ×2,
×2, ![]() ×2,
×2, ![]() ×2)
×2)
Adjustment of the Flat Fold Booklet Unit
BOOKLET FINISHER SR3170 / FINISHER SR3160 (D688/D689)
BOOKLET FINISHER SR3170 / FINISHER SR3160 (D688/D689)
BOOKLET FINISHER SR3170 / FINISHER SR3160 (D688/D689)
1.7 ADJUSTMENT OF THE FLAT FOLD BOOKLET UNIT
1.7.1 ADJUSTING THE ALIGNMENT OF THE FLAT FOLD ROLLERS
To adjust the folding strength, adjust the difference in vertical alignment between the flat fold rollers.
1. Booklet unit (page 27 "Booklet unit")
2. Fold plate bracket [A] ![]() ×2)
×2)
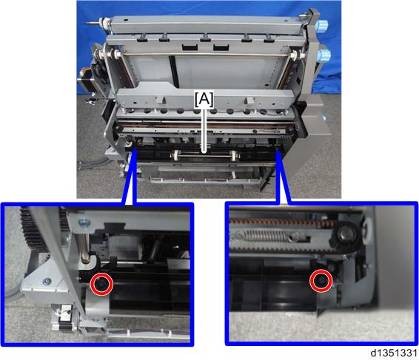
3. Open the bracket [A] of the flat fold roller.
Adjustment of the Flat Fold Booklet Unit
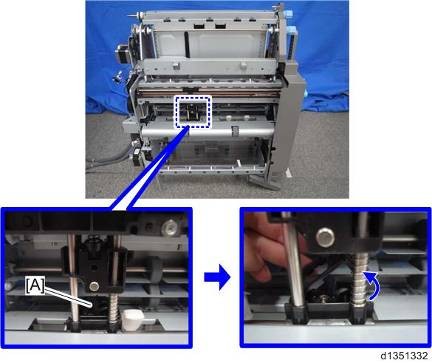
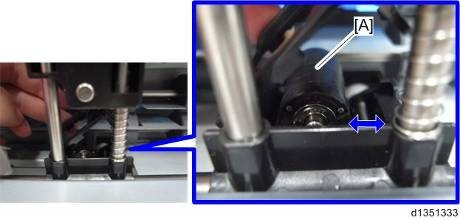
4. Adjust the position of the flat fold lower roller [A] to adjust the difference in alignment between the upper and lower rollers of the flat fold booklet unit.
![]()
To lower the booklet fold height (increase folding strength), roller offset is increased. To raise the booklet fold height (decrease folding strength), roller offset is decreased. When the machine is shipped from the factory, the booklet fold height is set low by offsetting the rollers. However, since the folding strength is high, toner cracking may occur at fold lines. In such a case, toner cracking at fold lines may be reduced by adjusting the offset amount to 0 mm.
Adjustment of the Flat Fold Booklet Unit
BOOKLET FINISHER SR3170 / FINISHER SR3160 (D688/D689)
BOOKLET FINISHER SR3170 / FINISHER SR3160 (D688/D689)
BOOKLET FINISHER SR3170 / FINISHER SR3160 (D688/D689)
Difference in Alignment and Folding Strength
Difference in Alignment | Folding Strength | Thickness of the booklet | The amount of toner sticking to the folding line |
3mm (default) | Strong | Thin | OK |
0mm | Weak | Thick | Good |
5. Close the bracket after the adjustment.
6. Reassemble the machine.
Adjustment of the Flat Fold Booklet Unit
1.7.2 ADJUSTING THE FOLDING SPEED
You can adjust the thickness of the booklet by adjusting the moving speed of the flat fold booklet unit.
If you want to make the booklet thinner, set a slower speed. If you want to make the booklet thicker, set a faster speed.
1. Enter the SP mode.
2. Set the moving speed of the flat fold booklet unit for each paper size with SP6-114-001 to 010 (Fold Speed Adj.: 2K/3K FIN).
SP | Setting Items | Selection | Default Value |
SP6-114-001 | Fold Speed Adj.: 2K/3K FIN: A3 SEF | 0: Standard* 1: Middle 2: Low | 0: Standard |
SP6-114-002 | Fold Speed Adj.: 2K/3K FIN: B4 SEF | ||
SP6-114-003 | Fold Speed Adj.: 2K/3K FIN: A4 SEF | ||
SP6-114-004 | Fold Speed Adj.: 2K/3K FIN: B5 SEF | ||
SP6-114-005 | Fold Speed Adj.: 2K/3K FIN: DLT SEF | ||
SP6-114-006 | Fold Speed Adj.: 2K/3K FIN: LG SEF | ||
SP6-114-007 | Fold Speed Adj.: 2K/3K FIN: LT SEF | ||
SP6-114-008 | Fold Speed Adj.: 2K/3K FIN: 12"×18" | ||
SP6-114-009 | Fold Speed Adj.: 2K/3K FIN: 8K SEF | ||
SP6-114-010 | Fold Speed Adj.: 2K/3K FIN: Other |
* [0: Standard] is faster than [1: Middle].
3. Exit the SP mode.
Stapler Unit
BOOKLET FINISHER SR3170 / FINISHER SR3160 (D688/D689)
BOOKLET FINISHER SR3170 / FINISHER SR3160 (D688/D689)
BOOKLET FINISHER SR3170 / FINISHER SR3160 (D688/D689)
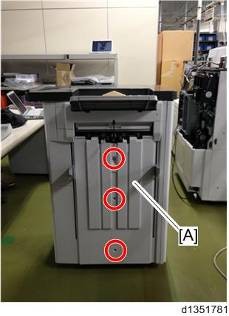
1.8 STAPLER UNIT
1. Remove the following covers (page 1 "Rear Upper Cover, Rear Lower Cover, Upper Cover")
Front left side cover
Rear upper cover
2. Stapler Unit rear side [A] ![]() ×2,
×2, ![]() ×1)
×1)
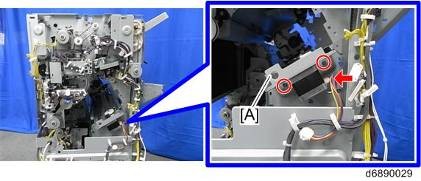
3. Stapler Unit front side [A] ![]() ×2)
×2)
4. Stapler Unit [A]