HOME PAGE | < Previous | Contents | Next >
Installation
Installation
Installation
2.2.4 IMAGE QUALITY TEST / SETTINGS
Image quality test
When there are other options to be installed, install according to the procedure for each.
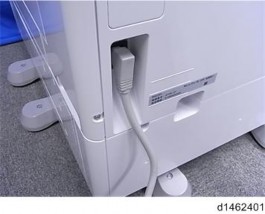
1. After checking that clamps, etc., have been removed, connect the power plug to the wall socket.
2. Turn the main power supply switch ON.
3. Check that the operation panel shows the following display. "Please supply the tray with paper."
4. The paper size is basically detected automatically.
1. Pull out the paper feed tray slowly until it stops.
2. While pressing the release lever, adjust the side fence to the paper size to be set.
3. Set the back fence.
Checking the copy image with the test chart
Check the copy image with the test chart.
Paper setting
1. Set some paper in the feed tray.
* SP5-181-001 to 017 (Size Adjust)
1. If necessary, adjust the registration for the paper feed tray.
* SP1-002-002 (Side-to-Side Registration Paper Tray 1)
* SP1-002-003 (Side-to-Side Registration Paper Tray 2)
Security Function Installation
The machine contains the Security functions (Data Overwrite Security and HDD Encryption unit) built into the controller board.
If you are installing a new machine, it is recommended to activate the Data Overwrite Security and HDD Encryption unit by selecting "Format All Data" from “System Settings” on the operation panel.
Main Machine Installation
![]()
This method is recommended because there is no user data on the hard drive yet (Address Book data, image data, etc.).
If the customer wishes to activate the Data Overwrite Security and HDD Encryption unit on a machine that is already running, it is recommended to activate the unit by selecting "All Data" from “System Settings” on the operation panel.
![]()
Selecting "All Data" will preserve the data that has already been saved to the hard drive. (If "Format All Data" is selected, all user data saved to the hard drive up to that point will be erased).
Immediately after encryption is enabled, the encryption setting process will take several minutes to complete before you can begin using the machine.
![]()
If encryption is enabled after data has been stored on the disk, or of the encryption key is changed, this process can take up to three and a half hours or more.
The machine cannot be operated while data is being encrypted. Once the encryption process begins, it cannot be stopped.
Make sure that the machine's main power is not turned off while the encryption process is in progress.
If the machine's main power is turned off while the encryption process is in progress, the hard disk will be damaged and all data on it will be unusable.
Print the encryption key and keep the encryption key (which is printed as a paper sheet).
Keep the encryption key in a safe place. If the encryption key is lost and is needed, the controller board, hard disk and NVRAM must all be replaced at the same time.
![]()
"NVRAM" mentioned in here means the NVRAM on the Controller Board.
"NVRAM" or EEPROM on the BCU has nothing to do with this.
Please use the following procedure when the Data Overwrite Security and HDD Encryption is reinstalled.
Data Overwrite Security
Before You Begin the Procedure
1. Make sure that the following settings (1) to (3) are not at their factory default values.
(1) Supervisor login password
(2) Administrator login name
(3) Administrator login password
If any of these settings is at a factory default value, tell the customer these settings must be changed before you do the installation procedure.
2. Make sure that “Admin. Authentication” is on.
[System Settings] -> [Administrator Tools] -> [Administrator Authentication Management] ->
Main Machine Installation
[Admin. Authentication]
If this setting is off, tell the customer this setting must be on before you do the installation procedure.
3. Make sure that “Administrator Tools” is enabled (selected).
Installation
Installation
Installation
[System Settings] -> [Administrator Tools] -> [Administrator Authentication Management] -> [Available Settings]
If this setting is disabled (not selected), tell the customer this setting must be enabled (selected) before you do the installation procedure.
Installation Procedure
1. Connect the network cable if it needs to be connected.
2. Turn on the main power switch.
3. Go into the SP mode and push “EXECUTE” in SP5-878-001.
4. Exit the SP mode and turn off the operation switch. Then turn off the main power switch.
5. Turn on the machine power.
6. Do SP5-990-005 (SP print mode Diagnostic Report).
7. Go into the User Tools mode, and select [System Settings] ![]() [Administrator Tools]
[Administrator Tools] ![]() [Auto Erase Memory Setting]
[Auto Erase Memory Setting] ![]() [On].
[On].
8. Exit the User Tools mode.
| Icon [1] | This icon is lit when there is temporary data to be overwritten, and blinks during overwriting. |
| Icon [2] | This icon is lit when there is no temporary data to be overwritten. |
Main Machine Installation
9. Check the display and make sure that the overwrite erase icon appears.
10. Check the overwrite erase icon.
The icon [1] is lit when there is temporary data to be overwritten, and blinks during overwriting.
The icon [2] is lit when there is no temporary data to be overwritten.
HDD Encryption
Before You Begin the Procedure:
1. Make sure that the following settings (1) to (3) are not at the factory default settings.
(1) Supervisor login password
(2) Administrator login name
(3) Administrator login password
These settings must be set up by the customer before the HDD Encryption unit can be installed.
2. Confirm that "Admin. Authentication" is on: [User tools/Counter] key -> [System Settings] -> [Administrator Tools] -> [Administrator Authentication Management] -> [Admin. Authentication] -> [On]
If this setting is off, tell the customer that this setting must be on before you can do the installation procedure.
3. Confirm that "Administrator Tools" is selected and enabled.
[User tools/Counter] key -> [System Settings] -> [Administrator Tools] -> [Administrator Authentication Management] -> [Available Settings]
"Available Settings" is not displayed until step 2 is done.
If this setting is not selected, tell the customer that this setting must be selected before you can do the installation procedure.
Installation Procedure:
1. Turn on the main power switch, and then enter the SP mode.
2. Select SP5878-002, and then press "Execute" on the LCD.
3. Exit the SP mode after "Completed" is displayed on the LCD.
4. Turn off the main power switch.
Enable Encryption Setting:
1. Press the [User tools/Counter] key.
2. Press [System Settings].
3. Press [Administrator Tools].
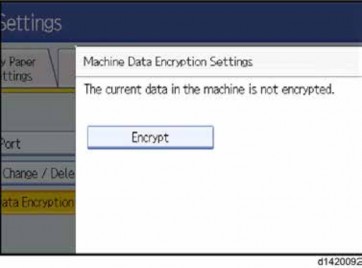
4. Press [Machine Data Encryption Settings].If this item is not visible, press [Next] to display more settings.
5. Press [Encrypt].
Main Machine Installation
Installation
Installation
Installation
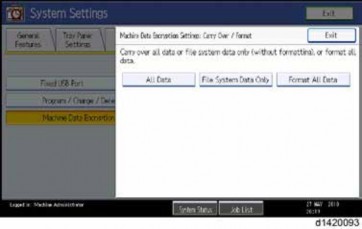
1. Select the data to be carried over to the hard disk and not be reset. To carry all of the data over to the hard disk, select [All Data].
To carry over only the machine settings data, select [File System Data Only]. To reset all of the data, select [Format All Data].
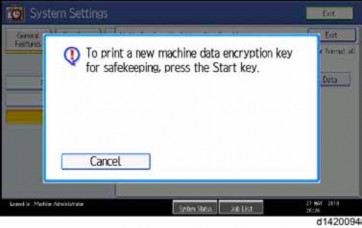
2. The following message will be displayed. Press the [Start] key to print the encryption key for safe keeping.
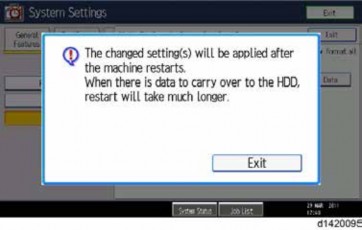
3. Press [Exit] to remove the following message.
Main Machine Installation
4. Press [Exit] again.
5. Press the [User Tools/Counter] key.
![]()
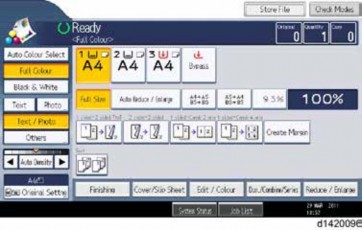
After step 10, the initial operation display appears as below. However, HDD data encryption has not been completed at this moment. Step 11 and step 12 should be performed in order to encrypt the HDD data.

6. Turn the main power switch off and on.

7. "Memory Conversion complete. Turn the main power switch off" is displayed as below. Then turn the main power switch off and on.
8. Then initial operation display appears again. After this step, HDD data encryption has already been completed.
Main Machine Installation
Installation
Installation
Installation
Check the Encryption Settings
1. Press the [User tools/Counter] key
2. Press [System Settings].
3. Press [Administrator Tools].
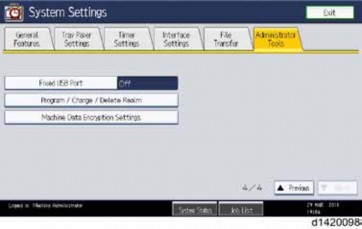
4. Press [Machine Data Encryption Settings].
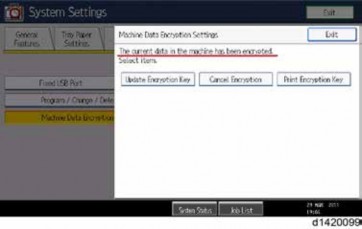
5. Please confirm whether the encryption has been completed or not on this display.
Main Machine Installation
Print the encryption key
Use the following procedure to print the key again if it has been lost or misplaced.
1. Press the [User tools/Counter] key.
2. Press [System Settings].
3. Press [Administrator Tools].
4. Press [Machine Data Encryption Settings].
If this item is not visible, press [Next] to display more settings.
1. Press [Print Encryption Key].
Encryption key sample
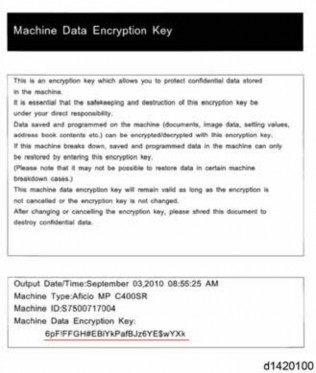
The encryption key is printed out as a sheet of paper like the example shown above. Please instruct the customer to keep it in a safe place.

