HOME PAGE | < Previous | Contents | Next >
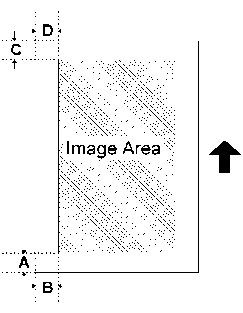
4.19.4 ERASE MARGIN ADJUSTMENT
![]()
Adjust the erase margin C and D only if the registration (main scan and sub scan) cannot be adjusted within the standard values. Do the registration adjustment after adjusting the erase margin C and D, and then adjust the erase margin A and B.
Replacement and Adjustment
Replacement and Adjustment
Replacement and Adjustment
1. Enter SP2-109-003.
2. Print out the test pattern (14: 1-dot trimming pattern) with SP2-109-003.
3. Check the erase margin A and B. Adjust them with SP2-103-001 to -015 if necessary.
Leading edge: 0.0 to 9.0 mm (default: 4.2 mm)
Side-to-side: 0.0 to 9.0 mm (default: 2.0 mm)
Trailing edge: 0.0 to 9.0 mm (default: 4.2 mm)
4.19.5 COLOR REGISTRATION
Line Position Adjustment
The automatic line position adjustment usually is done for a specified condition to get the best color prints.
Do the following if color registration shifts:
SP2-111-004: Forced Line Position Adj. Mode d
The result can be checked with SP2-194-007 (MUSIC Execution Result Execution Result) (0:Succeed, 1: Fail).
Also, results for each color can be checked with SP2-194-010 to 013.
You should also do the line position adjustment at these times:
After you transport or move the machine (you should do the forced line position adjustment if you install the machine at the user location.) if the machine is pre-installed