HOME PAGE | < Previous | Contents | Next >
IEEE 802.11a/g/n Interface Unit Type M2
Attaching the antenna
1. Stick the fastener provided on the antenna case.
![]()
Stick the fastener provided on the lower half (cable side) of the case.
It can be stuck to either side of the antenna case.
2. Attach the 2 antennas to the rear cover of the MFP.
![]()
The two antennas must be attached at least 12 cm apart from each other.
3. Stick 8 cable stickers on the rear face of the MFP.
4. Fix the cable.
![]()
Take care to loop it around so that it does not interfere with other options or I/F cables.
5. Switch the power supply ON.
6. Check that the system settings list is output, and the option is recognized correctly.
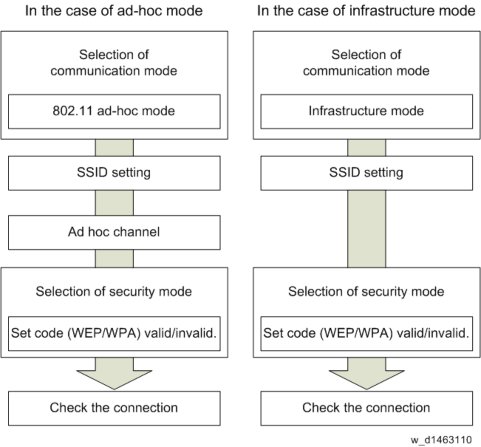
2.25.3 SETTINGS
Check the connection of the wireless LAN interface
1. Check the IPv4 address and subnet mask, or IPv6 address setting of the MFP.
2. Press the [Default setting/counter] key.
3. Press the [System default setting] button.
4. Choose [Wireless LAN] in [Interface setting].
5. Set each item, and press the [Setting] button.
Installation
Installation
Installation
IEEE 802.11a/g/n Interface Unit Type M2
![]()
For details, refer to instructions for use. (Check instructions for use, “Network connection/System default setting” "Wireless LAN interface connection")
If the extended wireless LAN board does not work correctly, refer to the leaflet provided in the options box.