7. Press Exit two times to return to the copy window when you are finished.
System Maintenance
At locations where the machine contains sensitive data, the customer engineer cannot operate the machine until the Administrator turns the service mode lock off. This function makes sure that work on the machine is always done with the permission of the Administrator.
If you cannot go into the SP mode, ask the Administrator to log in with the User Tool and then set "Service Mode Lock" to OFF after he or she logs in:
User Tools > Machine Features > System Settings > Administrator Tools > Service Mode Lock > OFF
This unlocks the machine and lets you get access to all the SP codes.
The CE can service the machine and turn OFF then ON the machine power. It is not necessary to ask the Administrator to log in again each time the main power is turned ON.
Go into the SP mode and set SP5-169 to "1" if you must use the printer bit switches.
After machine servicing is completed:
Change SP5-169 from "1" to "0".
Turn OFF then ON the machine power. Tell the administrator that you have completed servicing the machine.
The Administrator will then set the "Service Mode Lock" to ON.
The maximum number of characters which can show on the control panel screen is limited to 30 characters. For this reason, some of the SP modes shown on the screen need to be abbreviated. The following are abbreviations used for the SP modes for which the full description is over 20 characters.
Item | Description |
Paper Weight | Thin paper: 52-59 g/m2, 14-15lb. Bond Plain Paper1: 60-74 g/m2, 16-20lb. Bond Plain Paper2: 75-81 g/m2, 20lb. Bond Middle Thick: 82-105 g/m2, 20-28lb. Bond Thick Paper1: 106-169 g/m2, 28lb. Bond-90lb. Index Thick Paper2: 170-220 g/m2, 65-80lb. Cover Thick Paper3: 221-256 g/m2, 80lb. Cover-140lb. Index Thick Paper4: 257-300 g/m2, 140lb. Index-110lb. Cover |
Item | Description |
Paper Type | N: Normal paper MTH: Middle thick paper TH: Thick paper |
Paper Feed Station | P: Paper tray B: Bypass tray |
Print Mode | S: Simplex D: Duplex |
The settings of each SP mode are explained in the right-hand column of the SP table in the following way.
[Adjustable range / Default setting / Step] Alphanumeric
If "Alphanumeric" is written to the right of the bracket as shown above, the setting of the SP mode shows on the screen using alphanumeric characters instead of only numbers. However, the settings in the bracket in the SP mode table are explained by using only the numbers.
Notation | What it means |
ENG | Engine SP |
CTL | Controller SP |
FA | Factory setting: Data may be adjusted from the default setting at the factory. Refer to the factory setting sheets enclosed. You can find it in the front cover. |
DFU | Design/Factory Use only: Do not touch these SP modes in the field. |
* | An asterisk (*) to the left side of ENG/CTL column means that this mode is stored in the NVRAM. If you do a RAM clear, this SP mode will be reset to the default value. "ENG" and "CTL" show which NVRAM contains the data. |
*ENG: NVRAM on the BCU board
*CTL: NVRAM on the controller board
Notation | What it means |
SSP | This denotes a "Special Service Program" mode setting. |
System Maintenance
See "Appendices" for the following information:
Engine SP Tables - SP1000
Engine SP Tables - SP2000
Engine SP Tables - SP3000
Engine SP Tables - SP4000
Engine SP Tables - SP5000
Engine SP Tables - SP6000
Engine SP Tables - SP7000
Input Check
Output Check
Controller SP Tables - SP5000
Controller SP Tables - SP7000
Controller SP Tables - SP8000
Printer Service Menu
Scanner Service Menu
System Maintenance
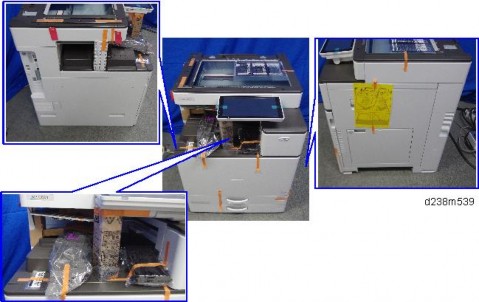
In order to update the firmware of this machine, it is necessary to download the latest version of firmware on an SD card.
Insert the SD card into SD card slot 2 beside the rear left of the controller box.
SFU | SD Card | RFU | ARFU | |
Individual firmware | N/A | Available | Available | N/A |
Package firmware | Available | Available | Available | Available |
Firmware type | Firmware location |
System/Copy | Controller Board |
Engine | BCU |
Operation Panel | Smart Operation Panel |
ADF | ADF |
Finisher1 | Finisher |
Bank | Bank |
FCU | FCU |
Network Support | Smart Operation Panel – CPU board |
Bank2 | Bank |
BIOS | BCU |
HDD format option | Controller Board |
RPCS | Controller Board |
PS | Controller Board |
Firmware type | Firmware location |
RPDL | Controller Board |
R98 | Controller Board |
R16 | Controller Board |
RPGL | Controller Board |
R55 | Controller Board |
RTIFF | Controller Board |
PCL | Controller Board |
PCLXL | Controller Board |
MSIS | Controller Board |
Controller Board | |
PictBridge | Controller Board |
PJL | Controller Board |
MediaPrint: JPEG | Controller Board |
MeidaPrint: TIFF | Controller Board |
XPS | Controller Board |
FONT | Controller Board |
FONT1 | Controller Board |
FONT2 | Controller Board |
Copy apl | Smart Operation Panel – CPU board |
NetworkDocBox | Smart Operation Panel – CPU board |
Fax apl | Smart Operation Panel – CPU board |
Printer apl | Smart Operation Panel – CPU board |
Scanner apl | Smart Operation Panel – CPU board |
Remote Fax apl | Smart Operation Panel – CPU board |
MIB | Smart Operation Panel – CPU board |
Firmware type | Firmware location |
Websupport | Smart Operation Panel – CPU board |
WebUapl | Smart Operation Panel – CPU board |
CSPF | Smart Operation Panel – CPU board |
System Maintenance
Modules included in the firmware package are indicated by ticks ![]() ). Firmware not included in the package require updating by SD cards, etc.
). Firmware not included in the package require updating by SD cards, etc.
Included | Firmware |
- | aics |
| animation |
| Application Site |
| BluetoothService |
| CheetahSystem |
- | CSPF |
- | Data Erase Onb |
- | EcoInfoWidget |
| Engine |
- | External Auth |
| Fax |
- | FaxInfoWidget |
| GWFCU3.8-9(WW) |
An SD card is a precision device, so when you handle an SD card, respect the following.
When the power is switched ON, do not insert or remove a card.
During installation, do not switch the power OFF.
Since the card is manufactured to high precision, do not store it in a hot or humid location, or in direct sunlight.
Do not bend the card, scratch it, or give it a strong shock.
Before downloading firmware to an SD card, check whether write-protection of the SD card is canceled. If write-protection is enabled, an error code (error code 44, etc.) will be displayed during download, and the download will fail.
Before updating firmware, remove the network cable from this machine.
If SC818 is generated during software update, switch the power OFF -> ON, and complete the update which was interrupted.
During software update, disconnect network cables and interface cables, remove wireless boards, etc., (so that they are not accessed during the update).
If the SD card is blank, copy the entire "romdata" folder onto the SD card.
If the card already contains the "romdata" folder, copy the "D244" folder onto the card.
If the card already contains folders up to "D244", copy the necessary firmware files (e.g. D244xxxx.fwu) into this folder.
Do not put multiple machine firmware programs on the same SD card. Copy the only model firmware you want.

System Maintenance

Check whether the card is properly in the SD card slot. When a SD card is inserted, a click is heard, and it is locked.
To remove the card, release by pressing once.
When it appears, "Please Wait" is displayed.

Press the module selection button or [1] - [5] on the 10-key pad.
Choose the appropriate module. (If already selected, cancel the selection)
Keys or buttons to press | Contents |
[Exit] or 10-key pad [0] | Returns to normal screen. |
[Start] Key | Select all modules. |
[Clear/Stop] key | Cancel all selections. |
On the above screen, two programs, i.e., engine firmware and printer application are displayed. (The screen may change depending on the firmware or application).
The display contents are as follows:
Display | Contents |
ROM: | Display installed module number / version information. |
NEW: | Display module number / version information in the card. |
The upper row corresponds to the module name, the lower row corresponds to the version number.

Depending on the combination of modules to update, it may not be possible to select all of them simultaneously.
Keys or buttons to press | Contents |
[Update] or [#] key | Update the ROM of the selected module. |
[Verify] button or [./*] key | Perform verification of the selected module. |

In the middle row, the name of the module currently being updated is displayed. (in this case, the printer module is being updated)
System Maintenance
In the lower row, a progress bar is displayed in ten steps. (The more *, the more the progress.)
<<Firmware update end screen>>

This screen is displayed when all selected firmware modules are to be updated. "Printer" in the second row shows that the module updated last is the printer. (When more than one were updated simultaneously, only the module that was updated last is displayed.)
When Verify has completed normally, the Update done display of the above screen is "Verify done." If "Verify Error" is displayed, reinstall the software of the application displayed in the lower row.
When the power supply is switched OFF during firmware update, update is interrupted, and the power is switched ON again, normal operation cannot be guaranteed.
To guarantee operation, an update error continues to be displayed until update is successful.
In this case, insert the SD card again, switch the power ON, and continue download of firmware from the SD card automatically.
The PS3 firmware program is included in the preinstalled PDF firmware. In the default state, although the PS3 firmware program is hidden in the disabled state, the function is enabled by installing the PS3 card. (The program installed in the PS3 card is a dongle (key) for enabling the PS3 function).
Due to the above specification, the self-diagnosis result report shows the ROM module number / software version of the PDF firmware at the PS location.

EXX shows an error code.
For error codes, refer to the following table:
Code | Contents | Solutions |
20 | Physical address mapping cannot be performed. | |
21 | Insufficient memory for the download | |
22 | Decompression of compressed data failed. |
Switch the main power supply off and on to try again.
Re-insert the SD card to reboot it.
Replace the controller board if the above solutions do not solve the problem.
Switch the main power supply off and on to try again.
Replace the controller board if the updating cannot be done by switching the power off and on.
Switch the main power supply off and on to try again.
Replace the SD card used for the update.
Replace the controller board if the above solutions do not solve the problem.
Code | Contents | Solutions |
24 | SD card access error | |
32 | The SD card used after download suspension is incorrect. SD cards are different between the one which was inserted before power interruption and the one which was inserted after power interruption. | Replace all relevant boards if the update is done for the BCU and FCU. Replace the operation panel unit if the update is done for the operation panel. |
33 | Card version error. The wrong card version is downloaded. | |
34 | Destination error. A card for the wrong destination is inserted. | |
35 | Model error. A card for the wrong model is inserted. |
Re-insert the SD card.
Switch the main power supply off and on to try again.
Replace the SD card used for the update.
Replace the controller board if the above solutions do not solve the problem.
Insert the SD card containing the same program as when the firmware update was suspended, and then switch the main power supply off and on to try again.
There is a possibility that the SD card is damaged if the update cannot be done after the correct SD card has been inserted. In this case, try again with a different SD card.
Replace the controller board if the above solutions do not solve the problem.
Install the correct ROM update data for each version in the SD card.
Install the correct ROM update data for each destination (JPN/ EXP/ OEM) in the SD card.
Install the correct ROM update data for each model in the SD card.
System Maintenance
Code | Contents | Solutions |
36 | Module error. The program to be downloaded does not exist on the main unit. The download destination specified by the card does not match up to the destination for the main unit’s program. | |
38 | The version of the downloaded program has not been authorized for the update. | |
40 | Engine download fails. | |
41 | Fax download fails. | |
42 | Control panel / language download fails. | |
43 | Printing download fails. |
Install the program to be updated in advance.
There is a possibility that the SD card containing the program to be updated has not been mounted. Check to confirm that the SD card has been correctly mounted.
The SD card is incorrect if the program to be updated has been correctly installed. In this case, insert the correct SC card.
Make sure that the program to be overwritten is the specified version.
Switch the main power supply off and on to try again.
If the download fails again, replace the controller board and the BCU.
Switch the main power supply off and on to try again.
If the download fails again, replace the controller board and the FCU board.
Switch the main power supply off and on to try again.
If the download fails again, replace the controller board and the operation panel unit.
Switch the main power supply off and on to try again.
The SD card is damaged if the update fails again. Replace the SD card.
Code | Contents | Solutions |
44 | The data to be overwritten cannot be accessed when controller-related programs are downloaded. | |
49 | Firmware updates are currently prohibited. | |
50 | The results of the electronic authorization check have rejected the update data. | |
57 | @Remote is not connected at the date/time reserved for receiving the package firmware update from the network. | |
58 | Update cannot be done due to a reception route problem. | |
59 | HDD is not mounted. | |
60 | HDD could not be used during the package firmware update. | |
61 | The module ID for the package firmware update is incorrect. | |
62 | The configuration of the package firmware update files is incorrect. |
Switch the main power supply off and on to try again.
Install the correct ROM update data in the SD card.
Replace the controller board if the data to be overwritten is contained on the controller board.
The setting of Update Firmware in the Administrator Tools has been set to [Prohibit] by an administrator. Amend the setting to [Do not Prohibit] and try again.
Install the correct ROM update data in the SD card.
Check the @Remote connection.
Check the @Remote connection.
Check the HDD connection.
Try again.
Replace the HDD if the download fails again.
Prepare the correct package files.
Prepare the correct package files.
System Maintenance
Code | Contents | Solutions |
63 | Reception fails due to the power off at the reserved date/time of the remote firmware update from the network. | |
64 | Reception fails due to the power off at the reserved date/time of the package firmware update from the network. | |
65 | Reception fails due to the status error of the machine at the reserved date/time of the remote firmware update from the network. | |
66 | Reception failed due to the status error of the machine at the reserved date/time of the package firmware update from the network. | |
67 | Acquisition of the latest version information from the Gateway fails at the reserved date/time of the remote firmware update from the network. | |
68 | Acquisition of the latest version information from the Gateway fails. | |
69 | Download fails at the reserved date/time of the remote firmware update from the network. |
Update is to be done automatically when the next reception time has elapsed.
Reset the reservation date/time for the remote update.
Update is to be done automatically when the next reception time has elapsed.
Reset the reservation date/time for the remote update.
Check that the network is connected correctly.
Check that the network is connected correctly.
Check that the network is connected correctly.
Code | Contents | Solutions |
70 | Package firmware download from the network fails. | |
71 | Network communication error occurs at the reserved date/time of the package firmware update from the network. | |
72 | The setting of @Remote is invalid at the reserved date/time of the package firmware update from the network. |
Check that the network is connected correctly.
Check that the network is connected correctly.
Set the setting of @Remote Service in the Administrator Tools to [Do not Prohibit].
System Maintenance
The PDF firmware installed as standard contains the program required to print PS3 data by default. However, this PS3 program is normally disabled.
The PS3 firmware is a dongle (key) which enables PS3 data printing functions. When the PS3 firmware is installed, the PS3 program in the PDF firmware is enabled. Due to this specification, the self-diagnosis result report shows the ROM part number/software version of the PDF firmware contained in the PS3 program.
In this machine, software can be updated by remote control using @Remote.

SFU | SD | RFU | ARFU | |
Individual firmware | N/A | Available | Available | N/A |
Package firmware | Available | Available | Available | Available |
RFU is performable for a device which meets the following conditions.
The customer consents to the use of RFU.
The device is connected to a network via TCP/IP for @Remote.
System Maintenance
A HDD unit must be installed on the machine to enable the SFU or the package firmware update via SD card.
Each firmware module (such as System/Copy, Engine, etc.) used to be updated individually. However, an all-inclusive firmware package (package_ALL) is now available.
There are two ways to update using the firmware package.
Package firmware update via a network: SFU (Smart Firmware Update)
Package firmware update with an SD card

There are two methods for SFU.
Immediate Update: To update the firmware when visiting
Update at the next visit: To set the date and time for downloading. The firmware will be automatically downloaded beforehand and updated at the following visit.
"Update at the next visit" is recommended since firmware download may take some minutes due to the network condition.
SFU requires the connection to @Remote via a device which has the embedded
@Remote communicating function. When a machine is connected to @Remote via an intermediate device (RC Gate), the SFU function is disabled.
Package firmware update can also be performed using the conventional SD card method by writing the package firmware directly to the SD card.
SFU | SD Card | RFU | ARFU | |
Individual firmware | N/A | Available | Available | N/A |
Package firmware | Available | Available | Available | Available |
Enter the [Firmware Update] menu in the SP mode and update the package firmware.
The [Firmware Update] button will appear even when a machine is connected to
@Remote with a device which does not have an embedded @Remote communicating function.
If an error code is displayed, refer to page 5-16 "Error Screens During Updating".


System Maintenance


If the error code E66, which indicates that the download of the firmware has failed, is displayed, go back to step 1.
Update will be started automatically after the download is finished.
When the machine is in the update mode, the automatic update is suspended if a print job is started. After the print job is finished, press [YES] on the display shown below to restart updating.

The machine will automatically reboot itself.

The figures at the lower right of the display indicate "Number of updated items/ All items to be updated".
System Maintenance
It is possible to set the machine to download the package firmware which is necessary for SFU in advance, and then perform the actual installation at the next service visit. This saves waiting time for the firmware to download at the service visit.
Enter the [Firmware Update] menu in the SP mode and update the package firmware.
The [Firmware Update] button will appear even when a machine is connected to
@Remote with a device which does not have an embedded @Remote communicating function. If an error code is displayed, refer to page 5-16 "Error Screens During Updating".


"Next time to visit this customer": The package firmware will be automatically downloaded by this time/date.
"When to receive? (1-7)": The download of the package firmware will begin this number of days before the next visit.

In the two diagrams below, the firmware is set to be downloaded by the day before the next scheduled visit. In the first diagram, the download is successful on the first try. In the second diagram, the download fails three times and is successful on the fourth try.

If the firmware download fails or cannot be completed due to the network settings/condition, no power to the machine, or other reason, the machine will continue retrying every six hours until the scheduled deadline (up to a maximum of four tries). For example, if the download is
System Maintenance
set for the day before the next visit, the machine will attempt the download at 24 hours before the visit, and then continue trying every six hours (max. four tries total).
The retry is only performed in cases when the firmware download has failed.
If the machine is in Energy Saver mode when the download is scheduled to begin, the download will be performed in the background and the machine/panel will stay in Energy Saver mode.
The download will continue uninterrupted even if the customer initiates a print job, copy job, fax receiving or other operation while the download is in progress.
The download will be terminated if the customer turns the power off while the download is in progress.
If the download cannot be completed successfully by the time of the next scheduled visit, the machine will stop trying to download the firmware.


When the package firmware was downloaded successfully, the details of the download result are displayed as the following picture shows.
This information will only be displayed if the reserved firmware has already been downloaded. If not, all the data items are indicated with "-".
System Maintenance
Update is started.
If the version of the reserved package in the HDD is older than the latest version, the messages shown in the following picture are displayed.
If you wish to download the latest version, press [Execute] beside the message "Download and update the latest package." Then update of the package firmware will be started.
If you wish to update using the firmware in the HDD (old version), press [Execute] beside the message "Update to the received package."
The machine will automatically reboot itself.
System Maintenance
The figures at the lower right of the display indicate "Number of updated items/ All items to be updated".
If an error code is displayed, refer to page 5-16 "Error Screens During Updating".

If you copy the package firmware into the conventional "romdata" folder, the update will not work.
Only one version of the package firmware should be copied into the folder. If you copy multiple versions of package firmware to the SD card, the machine will select only one version of the firmware randomly.

When the SD card contains both a firmware package and one or more modules, the following display may show up. Select [Package] and press [OK] to move to step 5 above.
System Maintenance

The figures at the lower right of the display indicate "Number of updated items/ All items to be updated".
Auto remote firmware update (ARFU) requires connection to the Internet. Be sure to get permission from the customer before setting.
By Auto Remote Firmware Update (ARFU), the firmware is updated by checking the global server every 76 hours and downloading the latest package if it is newer than the one installed on the machine.
SFU | SD Card | RFU | ARFU | |
Individual firmware | N/A | Available | Available | N/A |
Package firmware | Available | Available | Available | Available |
Modules included in the firmware package are indicated by ticks ![]() ) in the firmware download web site.
) in the firmware download web site.
Firmware not included in the package require updating by SD cards, etc.
Included | Firmware |
- | aics |
| animation |
Included | Firmware |
| Application Site |
| BluetoothService |
| CheetahSystem |
- | CSPF |
- | Data Erase Onb |
- | EcoInfoWidget |
| Engine |
- | External Auth |
| Fax |
- | FaxInfoWidget |
| GWFCU3.8-9(WW) |
System Maintenance
The machine checks the server for the latest package version.
If the version of the package on the global server is later than that of the package installed on the
machine, or if the machine has not downloaded the firmware package, the machine downloads the latest package in the background even when the customer is using the machine.
If download fails, the machine will retry downloading 76 hours later.
The downloaded package can also be used with SFU (Smart Firmware Update). A package downloaded with SFU (Smart Firmware Update) can be used with ARFU (Auto Remote Firmware Update) and vice versa.
When replacing the hard disk, the firmware package data becomes lost from the hard disk. Even if the latest firmware is on the new hard disk, be sure to receive the latest package data.
When the machine connects to the server where the package files are stored, the DNS settings and the name solution by DNS are needed. The machine will still try to download the package even if the name cannot be resolved, but will fail as the name is not resolved.
The time and date to send the next inquiry to the global server can be checked with SP5-886-116 (Farm Update Setting: Auto Update Next Date).
The auto remote firmware update is executed every 76 hours.
Update judgement is done when the latest update package is successfully downloaded, or the package has already been downloaded.

If the judgement timing is in the range of the update prohibited time or day set with SP or WIM, the machine will retry the update after 76 hours.

System Maintenance
If the machine is in use when the judgement process runs, the process is retried. Retry is done up to three times every hour (can be changed with SP) and if the machine is in use for all three retries, the machine will retry the update after 76 hours

No. | Situations judged as machine in use |
1 | When the control panel is used within 30 seconds |
2 | During firmware update |
3 | While firmware update is disabled |
4 | While printing (copy, printer, fax, re-printing via network) |
5 | While scanning (copy, scanner, fax) |
6 | Retrieving image data via network |
7 | While initial setting (User Tools settings) or SP is being set |
No. | Situations judged as machine in use |
8 | While fax is transferring data |
9 | During on hook / on handset |
10 | During the PC-FAX process (from PC to machine data transfer to the end of the job) |
11 | While shifting to/from the energy server mode |
12 | When not being able to run firmware update due to the modules that are running e.g.) Waiting for DCS transfer (refer to appendix), accessing devices such as HDD/SD card, etc. |
13 | While displaying a preview |
14 | While the document server function is in use |
15 | Connecting to TWAIN |
16 | During the interrupt copy process |
17 | While displaying the printer menu |
18 | While updating the display for the document server function via WIM or for stored fax documents |
19 | While writing log information |
20 | While accessing the address book |
21 | During SC |
When the machine has decided to run the auto firmware update, the following message is displayed.
System Maintenance
The popup will have "Cancel" and "OK" buttons and the update process will start either when the "OK" button is selected or 30 seconds has passed.
When the "Cancel" button is selected, the machine will run the "Retry update" process.
When the device update and three retries in recovery mode both fail, it is determined as a device defect and will display an SC for the defective device. If such an SC appears, replace the indicated board. In the case of SC845, the SC cannot be reported to the call center.
Device name | SC number |
Engine board | SC845-01 |
Controller board | SC845-02 |
Operation panel (normal panel) | SC845-03 |
Operation panel (smart panel) | SC845-04 |
FCU | SC845-05 |
It is possible to cancel the Auto Remote Firmware Update (ARFU) or update in recovery mode from the operation panel.

But this is not possible while updating the operation panel itself. On the other hand, the update for the operation panel will run at the final stage of the update. Thus canceling the update at that stage has no real effect.
When the update is cancelled, the machine will reboot when updates for all modules of one of the following devices is done.
Engine Board
FCU
Controller Board
Operation Panel
For example, when the update process is cancelled while updating the first module of the operation panel, the machine will reboot when all modules in the operation panel have been updated.
The firmware contents included in the package can be referred to in the release note in SERES release of the package.
The next update will run 76 hours after the cancellation. The old (cancelled) package will be discarded if the package downloaded 76 hours later is the latest.
System Maintenance
In SP7-520-041 to -045 (Update Log: Auto:Version), you can check the versions of the packages updated by ARFU. (-041 displays the latest result. It is also printed on the SMC sheet.)
"-051" is the latest update result. For details about the number of each result log, see next section “Related SP.”
SP Number | Selection Def. | Overview |
SP5-886-111 | 0: OFF 1: ON | Sets auto update ON/OFF by ARFU. |
SP5-886-112 | 0: OFF 1: ON | Will not run the update when update prohibited time setting is ON and the current time is in the range of the time set. |
SP5-886-113 | 0 to 23 9 | |
SP5-886-114 | 0 to 23 17 | |
SP5-886-115 | 0: OFF 1: ON | Even when the update function is disabled, downloading the package is allowed. The downloaded package can be used with SFU. |
Start time < End time: Prohibited time is from the start time to the end time on the same day.
Start time > End time: Prohibited time is from the start time to the end time on the next day.
Start time == End time: Prohibited time setting is disabled. (Update will not be prohibited.)
SP Number | Selection Def. | Overview |
SP5-886-116 | Display only | Displays when the latest package check will run. |
SP5-886-117 | 1 to 24 1 | Set time for the next version check after retry. |
SP5-886-120 | 0x00 | Update will not run if the corresponding bit for each day below is set to 1. This setting is not affected by the prohibited time setting. e.g.) Prohibited on Mon., Fri., Sat., and Sun. : 0x47 (01000111) |
SP7-520-011 to 015 | Display only | History of date and time when update has started. The five most recent are recorded, the lowest number being most recent. If the last update failed, this is not recorded. |
SP7-520-021 to 025 | Display only | History of date and time when update has finished. The five most recent are recorded, the lowest number being most recent. The record is created when the update has successfully finished. When the update is cancelled, no record is created. |
SP7-520-031 to 035 | Display only | History of the package number (including suffix) for which update has completed. The five most recent are recorded, the lowest number being most recent. The record is created when the update has successfully finished. When the update is cancelled, no record is created. |
prohibited:bit7
Monday: bit 6
Tuesday: bit 5
Wednesday: bit 4
Thursday: bit 3
Friday: bit 2
Saturday: bit 1
Sunday: bit 0
SP Number | Selection Def. | Overview |
SP7-520-041 to 045 | Display only | History of the package version for which update has completed. The five most recent are recorded, the lowest number being most recent. The record is created when the update has successfully finished. When the update is cancelled, no record is created. |
SP7-520-051 to 060 | Display only | History of the result of the download and the update. Refer below for the numbers set. |
System Maintenance
No. | Result | Description |
1 | Downloading with SFU | Cannot download or update as the machine is now downloading the package for SFU. |
2 | HDD uninstalled | Cannot download or update as the machine has no HDD. |
3 | Updating with SFU | Cannot download or update as the machine is being updated with SFU. |
4 | HDD error | Cannot download or update as the HDD cannot be used. |
5 | Version information obtain error | Cannot download or update as the version information cannot be obtained. |
6 | Update download error | Cannot download or update as the update download failed. In non @Remote method, this shows that the download failed because there was no proxy set. |
7 | Name resolution error | Cannot download or update as the name cannot be resolved upon downloading the update. |
No. | Result | Description |
8 | Auto update setting disabled | The package has been downloaded but will not run the update as SP5-886-111 (auto update setting) is disabled and SP5-886-115 (auto download setting for SFU) is enabled. |
9 | Update prohibited time | Cannot start to update as the auto update prohibited time setting (SP5-886-112) is enabled and the time update initiated was in the range of prohibited time (SP5-886-113 to 114). Or the day which update was initiated was a day for which update was prohibited (SP5-886-120). |
10 | Update postponed due to machine in use | Cannot start update due to the following conditions when update was initiated. |
11 | Update cancelled by user | Update was cancelled because a user selected "Cancel" in the popup shown before starting the update. |
12 | Offline failed | Cannot start to update as the machine is offline for other reasons. |
13 | Update successful | Update was started and successfully completed. |
14 | Update failed | Update was started but failed. |
The machine is in use by a user (the panel was used within 30 seconds)
Machine offline for other reasons
Operation prohibited
Displaying SP/UP menu
Firmware update is running with another method
Configuration change prohibited
Verifying the operation panel (smart panel)
No. | Result | Description |
15 | Update deemed completed | Update was cancelled after the process was initiated because a user selected “Cancel”. There is no need to resume the update due to one of the following reasons: |
16 | Update cancelled by user after update initiated | Update was cancelled after the process initiated because a user selected "Cancel" during the update. |
17 | Version information obtain error (communication error occurred for hostname) | Cannot download or update as the name cannot be resolved when obtaining version information. |
18 | Version information obtain error (proxy verification failure) | Cannot download or update as the proxy verification failed with proxy settings when obtaining version information. |
19 | Version information obtain error (other than proxy verification failure when proxy is set) | Cannot download or update as an error other than proxy verification with proxy settings occurred when obtaining version information. |
20 | Update download error (proxy verification failure) | Cannot download or update as the proxy verification failed with proxy settings when downloading the package. |
21 | Update download error (other than proxy verification failure when proxy is set) | Cannot download or update as an error other than proxy verification with proxy settings occurred when downloading the package. |
A newer update has been released and received.
When retrying ARFU, the update has already been completed by another method.
System Maintenance
No. | Result | Description |
22 | Update by retry successful | After power failure, unsuccessful update, or rebooting, update by retry is executed successfully. However, this does not apply to the case where the update was cancelled after the process was initiated because a user selected “Cancel”. In this case, the update is “successful” if the retry is not executed between the start and completion of the next update (76 hours after the cancellation). |
System Maintenance
When unzipping the downloaded file, two subfolders ("update" and "sdk") exist in the "sdk" folder. Rather than just copying the subfolder "sdk", copy the whole folder "sdk".
SD card can be inserted with the machine power off.
During the updating process, do not turn off the power.
If you turn off the power during the updating, the machine performance is not guaranteed. (There is a possibility that an SC and boot failure occurs.)
If you accidentally turn off the power during the updating, retry the updating procedure from the beginning. (If the update fails again, you will need to replace the controller board.)
The Heap size setting is changed to the initial setting when updating.
When you fail to update, "Update SDK/J done FAIL" is displayed. You can confirm the cause of the error message below.
See the manual for the ESA application to know what value to set for the heap size.
Update results are output as a text file on the SD card called "sdkjversionup.log" in the "¥sdk
¥update" folder.
Result | File contents | Description of the output |
Success | script file = /mnt/sd0/sdk/update/bootscript 2012/08/22 17:57:47 start 2012/08/22 17:59:47 end SUCCESS | Boot script path Boot scripts processing start time End time boot script processing, the results |
Failure | script file = /mnt/sd0/sdk/update/bootscript 2012/08/22 17:57:47 start XXXX Error 2012/08/22 17:57:57 end FAIL | Boot script path Boot scripts processing start time Error message (Possibly multiple) End time boot script processing, the results |
Error Message | Cause | Remedy |
PIECEMARK Error,machine=XXXXX | Applied the wrong updating tool (Using the updating tool of a different model) | Use the correct updating tool for this model. |
pasePut() - error : The file of the copy origin is not found Put Error! | Inadequacy with the SD card for updating (Files are missing in the updating tool) | Re-create the SD card for updating. |
paseCopy() - error : The file of the copy origin is not found. Copy Error! | Inadequacy SD card for updating (Files in the updating tool are missing) | Inadequacy SD card for updating (Files in the updating tool are missing) |
Error Message | Cause | Remedy |
[file name: XX] error,No space left on device pasePut() - error : The destination directory cannot be made. pasePut() - error : fileCopy Error. Put Error! | Writing destination is full. (The NAND flash memory on the controller board is full.) | Uninstall the unnecessary SDK applications. If you can not uninstall it, implement escalation, stating the "model name, application configuration, SMC sheet (SP5-990-006/024/025), and error file." |
[file name: XX] error,No space left on device paseCopy() - error : The destination directory cannot be made. paseCopy() - error : fileCopy Error. Copy Error! | Writing destination is full. (The NAND flash memory on the controller board is full.) | Uninstall the unnecessary SDK applications. If you can not uninstall it, implement escalation stating the "model name, application configuration, SMC sheet (SP5-990-006/024/025), and error file." |
Put Error! *1 | Error, not normally expected to occur | If you cannot uninstall it, implement escalation stating the "model name, application configuration, SMC sheet (SP5-990-006/024/025), and error file." *1 Without the foregoing error message, only "Put Error / Copy Error" will be displayed |
Copy Error! *1 | ||
Delete Error! | ||
[XXXXX] is an unsupported command. | ||
Version Error |
System Maintenance
Do the following procedure to upload SP code settings from NVRAM to an SD card.
This data should always be uploaded to an SD card before the NVRAM is replaced.
Make sure that the write protection of an SD card is unlocked.
Make sure to shut down and reboot the machine once before printing the SMC. Otherwise, the latest settings may not be collected when the SMC is printed.
Here is an example with Serial Number "K5000017114": NVRAM¥K5000017114.NV
System Maintenance
You can upload NVRAM data from more than one machine to the same SD card.
Do the following procedure to download SP data from an SD card to the NVRAM in the machine.
The NVRAM data download may fail if the SD card with the NVRAM data is damaged, or if the connection between the controller and BCU is defective.
Do the download procedure again if the download fails.
Do the following procedure if the second attempt fails:
Enter the NVRAM data manually using the SMC print you created before uploading the NVRAM data.
The serial number of the file on the SD card must match the serial number of the machine for the NVRAM data to download successfully. The download fails if the serial numbers do not match.
This procedure does not download the following data to the NVRAM:
Total Count
C/O, P/O Count
The following information is possible to be uploaded and downloaded.
Information | |
Registration No.
User Code
Protection Code
Fax Destination
Fax Option
Group Name
Key Display
Select Title
Folder
Local Authentication
Folder Authentication
Account ACL
New Document Initial ACL
LDAP Authentication